


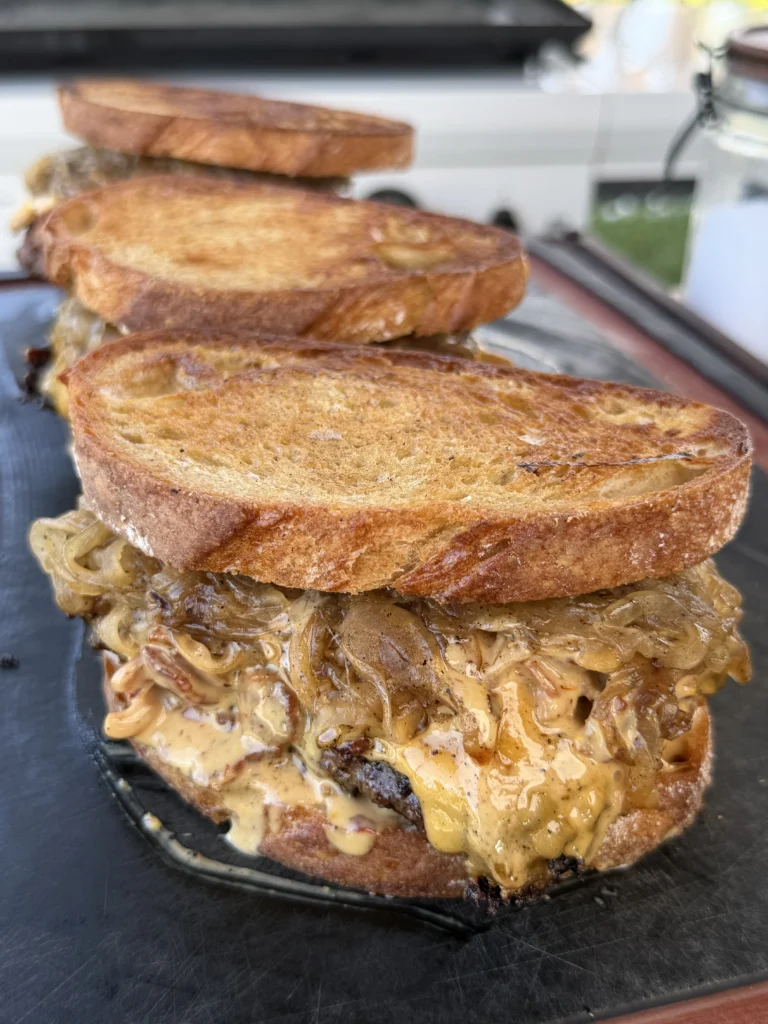
Baconnaise patty melts elevate the classic diner sandwich through superior ingredients and technique while doubling down on bacon flavor. These patty melts start with thin patties formed from 80/20 ground chuck that get seared on a hot griddle until deeply browned with juicy interiors. The secret weapon is homemade baconnaise – creamy mayonnaise blended with finely chopped crispy bacon, Dijon mustard, smoked paprika, and garlic powder that provides smoky, savory richness in every bite. Paper-thin onions sliced on a mandolin caramelize into sweet, jammy strands with help from butter, bacon grease, and Worcestershire sauce. Everything gets assembled between thick slices of Texas toast spread with baconnaise and stacked with Swiss cheese, the beef patty, caramelized onions, and crispy bacon strips before being butter-griddled until golden with molten cheese.
Baconnaise Patty Melts with Caramelized Onions
80/20 ground chuck patties griddled until juicy, layered with crispy bacon, paper-thin caramelized onions, Swiss cheese, and homemade bacon mayonnaise on butter-griddled Texas toast
Ingredients
For the Patty Melts:
For the Baconnaise:
What makes this bacon patty melt recipe special is how it layers bacon flavor throughout rather than just adding strips on top. The baconnaise incorporates finely chopped bacon that provides texture and concentrated flavor in the creamy spread, while whole bacon strips add crispy contrast. Cooking the onions in reserved bacon grease adds another layer of smoky pork flavor that complements rather than overwhelms. The result is bacon presence in every component without being greasy or one-dimensional.
This patty melt with homemade baconnaise delivers restaurant-quality results with straightforward technique. The mandolin ensures uniformly thin onions that caramelize evenly, while the 80/20 ground chuck provides the fat content needed for juicy patties. Texas toast’s thickness prevents the sandwich from getting soggy while providing substantial crunch when butter-griddled. Master this recipe and you’ll have a signature sandwich that combines the best elements of burgers and grilled cheese into something greater than either alone.
Understanding the Patty Melt
Patty melts occupy the delicious middle ground between burgers and grilled cheese sandwiches, combining elements of both into a unique creation. Unlike burgers served on buns, patty melts use sandwich bread that gets butter-griddled like grilled cheese. The bread’s flat surfaces create maximum contact with the cooking surface, developing golden-brown crust across the entire exterior. This creates more crispy surface area than a burger bun, with superior textural contrast between crunchy bread and soft, cheese-laden interior.
Traditional patty melts originated in diners during the 1940s or 1950s, though their exact origin is disputed. The classic version features a thin beef patty, caramelized onions, and Swiss cheese on rye bread, all griddled until crispy and melted. This combination became a diner staple because it’s economical, satisfying, and cooks quickly on a flat-top griddle. The flat cooking surface allows multiple sandwiches to cook simultaneously while developing even browning impossible on a grill with bars.
What distinguishes patty melts from burgers is the cooking method and bread choice. Burger buns get toasted but the burger itself cooks separately. Patty melts cook as assembled sandwiches with the bread as an integral component. The butter on the bread’s exterior browns and crisps while the interior heat melts the cheese and warms everything through. This creates a cohesive sandwich where every element melds together rather than distinct layers.
The thin patty is crucial to patty melt success. Thick burgers would leave the bread burnt before the center cooks through and the cheese melts. Thin patties – about quarter to third-inch thick – cook quickly enough that the bread reaches perfect golden-brown crispness right when the cheese melts completely. This timing creates the ideal patty melt where every component finishes simultaneously.
Why 80/20 Ground Chuck Is Essential
Ground chuck with an 80/20 ratio – eighty percent lean meat to twenty percent fat – provides the ideal balance of flavor and moisture for patty melts. The twenty percent fat content keeps the thin patties juicy during cooking while providing the rich, beefy flavor that leaner ground beef lacks. When you bite into a properly cooked 80/20 patty, you should get juice running down your chin – that’s the rendered fat mixed with meat juices creating the signature burger experience.
Ground chuck specifically comes from the shoulder section of the cow, which has good marbling and intense beef flavor. The chuck’s connective tissue breaks down during grinding, creating texture that holds together well when formed into patties. Pre-ground 80/20 chuck from the grocery store works perfectly – you don’t need to grind your own. Just make sure it’s freshly ground, not meat that’s been sitting in the case for days developing oxidized flavors.
The fat content matters even more for thin patties than thick burgers. Thin patties have more surface area relative to their volume, meaning more moisture evaporates during cooking. The fat provides insurance against dryness, keeping the meat juicy even when cooked through. Leaner ground beef like 90/10 creates dry, crumbly patties that lack richness – especially problematic in thin patties where there’s less margin for error.
The rendered fat also contributes to crust development. As fat melts out during cooking, it spreads across the griddle surface, essentially frying the patty in its own rendered fat. This creates better browning than lean meat would achieve. The Maillard reaction that creates crust works better when fat is present to conduct heat and provide medium for the chemical reactions.
Making Homemade Baconnaise
Baconnaise combines the creamy richness of mayonnaise with the smoky, savory intensity of crispy bacon to create a spread that’s exponentially more interesting than either component alone. The technique is straightforward – finely chop crispy bacon and stir it into mayonnaise along with seasonings – but the result transforms sandwiches from good to exceptional. The bacon provides texture, concentrated pork flavor, and subtle smokiness that permeates the creamy mayo base.
The bacon must be cooked until genuinely crispy – almost shattering when bent. Chewy or underdone bacon won’t chop into fine pieces and will create unpleasant rubbery bits in the spread. Crispy bacon crumbles into small pieces that distribute evenly through the mayo, providing bacon flavor in every bite rather than occasional big chunks. The bacon should be chopped finely – almost minced – so the pieces are barely perceptible texturally while contributing maximum flavor.
Dijon mustard adds tangy sharpness that cuts through the mayonnaise’s richness while its slight heat complements the bacon’s smokiness. The mustard also helps emulsify the spread, binding the bacon pieces with the mayo more cohesively. Smoked paprika reinforces the bacon’s natural smokiness while adding color – the baconnaise should be slightly tinted from the paprika rather than pure white. Garlic powder provides savory depth that rounds out the flavor profile.
A splash of lemon juice brightens everything, providing acidity that prevents the spread from tasting heavy or cloying despite being mayo-based. The acid also helps balance the saltiness from the bacon. Fresh lemon juice is essential – bottled lacks the aromatic oils and vibrant flavor. Just a teaspoon is enough to lift the flavors without making the spread taste citrusy.
Refrigerating the baconnaise for at least twenty to thirty minutes before using allows the flavors to meld. The mayo absorbs bacon flavor while the seasonings distribute evenly. The cold also helps the spread firm up slightly, making it easier to spread on bread without tearing. Baconnaise keeps refrigerated for up to five days, actually improving as it sits and the bacon flavor permeates the mayo more completely.
Why Texas Toast Works Best
Texas toast’s defining characteristic is its thickness – about three-quarters to one inch thick compared to regular sandwich bread’s half-inch slices. This thickness is crucial for patty melts because it provides substantial structure that won’t get soggy from the juicy patty and melted cheese. Thin bread becomes flimsy and falls apart when loaded with moist fillings, while Texas toast maintains integrity throughout eating.
The thickness also creates better textural contrast. When butter-griddled, the exterior becomes deeply golden and crispy while the interior stays soft and tender. This gradient from crunchy to soft provides more interesting texture than uniformly crispy thin bread. The thick slices also have more surface area for developing golden-brown crust, creating more of that buttery, toasted flavor that defines great patty melts.
Texas toast typically has a tighter crumb structure than artisan breads, meaning smaller air pockets that create denser texture. This density helps the bread hold up to the sandwich’s weight and moisture without disintegrating. The toast also has neutral, slightly sweet flavor that complements rather than competes with the patty, bacon, and onions. Avoid sourdough or other strongly flavored breads that would clash with the other components.
Pre-sliced Texas toast from the grocery store works perfectly – you don’t need to cut your own. Some brands sell “Texas toast” that’s already buttered for garlic bread, but for patty melts you want plain slices so you can control the butter application. The bread should be soft and fresh, not stale or dried out, as you want the interior to stay tender while the exterior crisps.
Ingredients
For the Patty Melts:
For the Baconnaise:
Step-by-Step Instructions
Cook All the Bacon
Place a large skillet or griddle over medium heat. Lay out all eight slices of thick-cut bacon in a single layer, working in batches if necessary to avoid crowding. Cook for three to four minutes per side, flipping occasionally, until the bacon is deeply browned and crispy. The bacon should shatter rather than bend when you try to break it – this level of crispness is crucial for both the baconnaise and the sandwich topping.
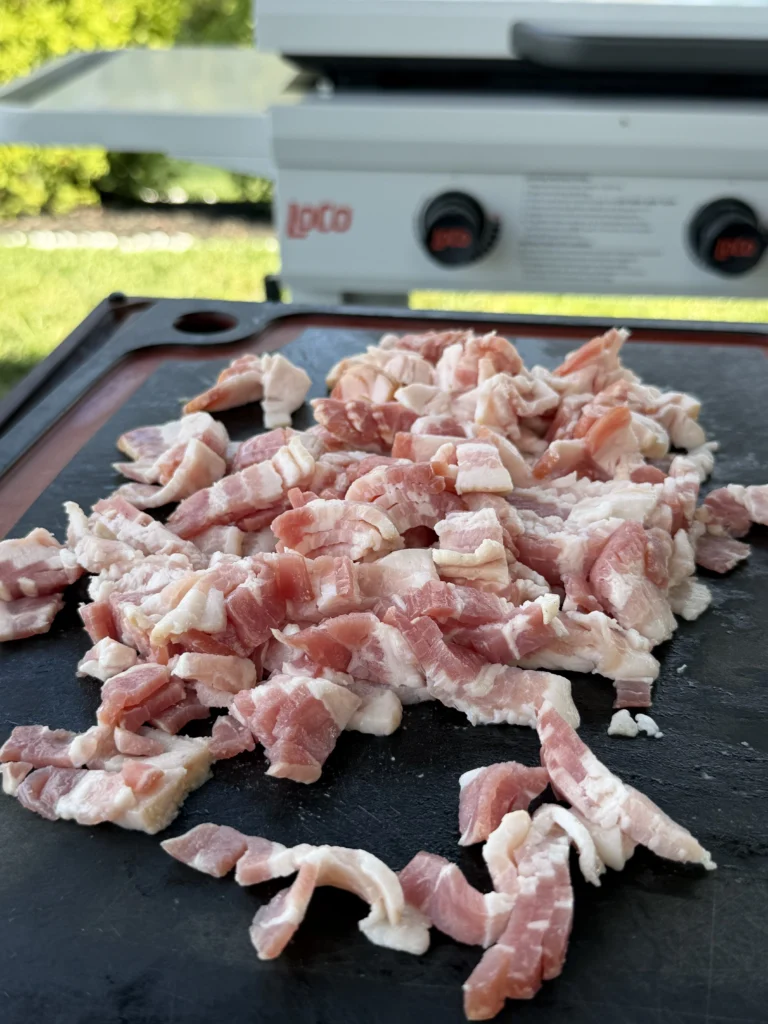
Transfer the cooked bacon to a paper towel-lined plate to drain. Once cool enough to handle, set aside four whole slices for topping the sandwiches. Finely chop the remaining four slices for the baconnaise – the pieces should be almost minced, barely larger than coarse breadcrumbs. Reserve one tablespoon of the bacon grease in a small bowl for cooking the onions – don’t discard it down the drain as it adds crucial flavor.
Make the Baconnaise
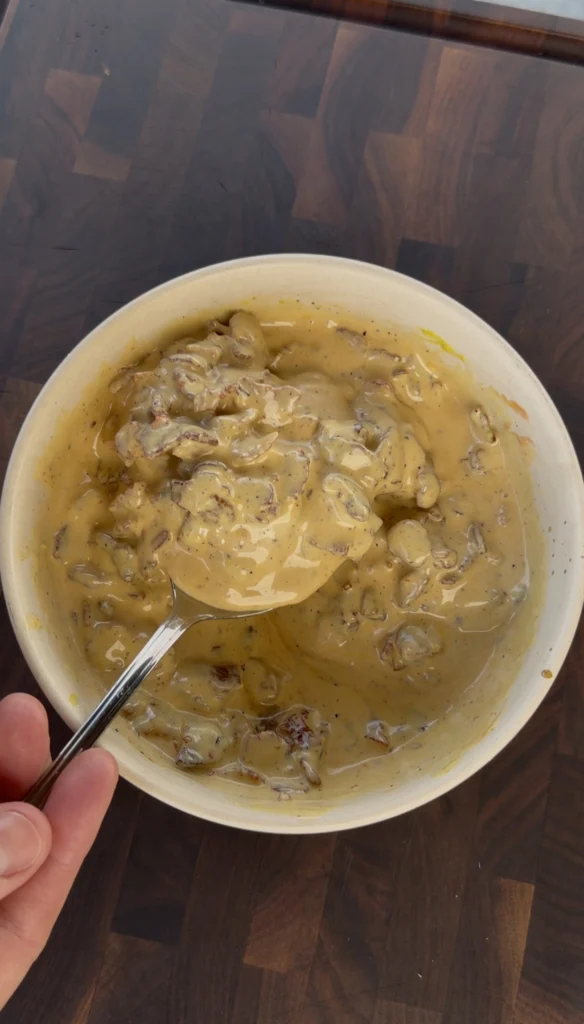
In a small bowl, combine the half cup of mayonnaise with the finely chopped bacon, one teaspoon of Dijon mustard, half teaspoon of smoked paprika, half teaspoon of garlic powder, pinch of cayenne if using, and one teaspoon of fresh lemon juice. Stir everything together vigorously with a spoon until the bacon pieces are evenly distributed throughout the mayo and no white streaks remain.

The baconnaise should be pale tan with visible bacon pieces throughout and smell intensely of smoky bacon. Taste carefully – it should be creamy with prominent bacon flavor, slight tang from the mustard and lemon, and warming spice notes from the paprika and garlic. Adjust seasoning if needed, though remember it will taste strong now because you’re tasting it straight rather than in the context of the sandwich. Cover and refrigerate while you prepare the other components. The cold helps it firm up and allows the flavors to meld.
Caramelize the Onions with Mandolin Precision
Using a mandolin, slice the large yellow onion into paper-thin rounds, about one-sixteenth inch thick. Use the hand guard for safety – mandolins are extremely sharp. Separate the onion slices into individual rings. You should have about two to three cups of sliced onions.
In a large skillet, melt the two tablespoons of butter over medium-low heat. Add the reserved tablespoon of bacon grease to the melted butter – the bacon fat adds smoky depth that ties the onions into the overall flavor profile. Add all the sliced onions to the pan and toss to coat them evenly in the fat. Season lightly with a pinch of kosher salt.
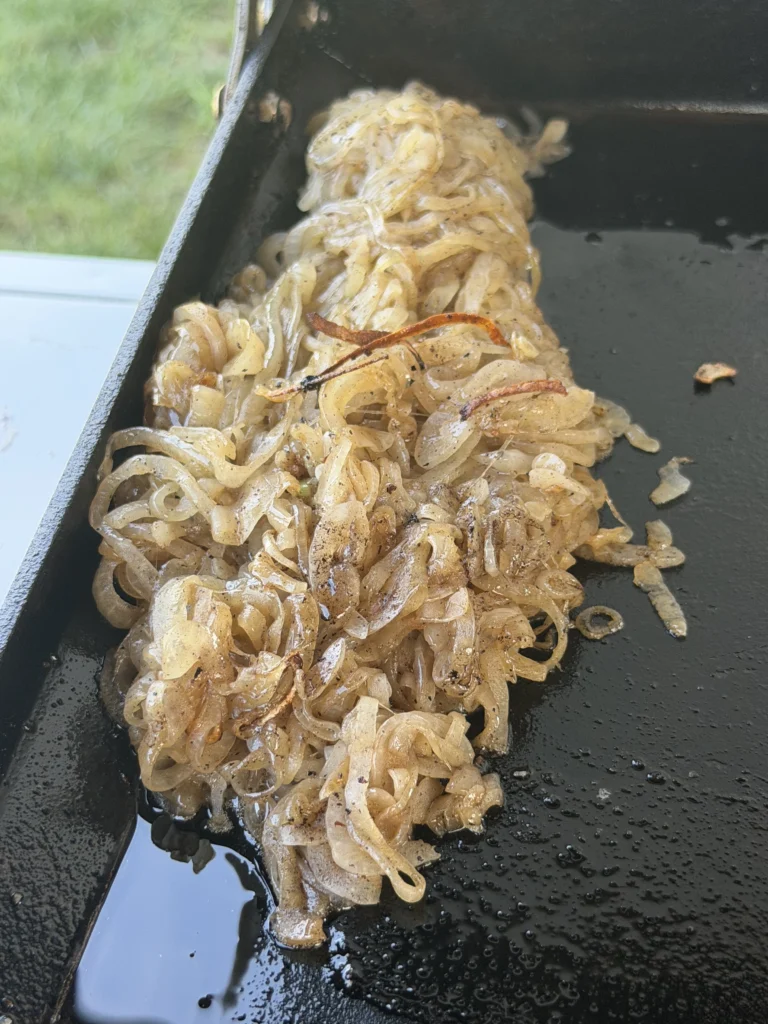
Cook the onions over medium-low heat for fifteen to twenty minutes, stirring every three to four minutes to ensure even cooking. At first, the onions will release moisture and seem wet and steamy. Don’t increase the heat to speed things up – this will burn them. Continue cooking patiently. After about ten minutes, once most of the moisture has evaporated, the onions will start to brown and shrink significantly. Add the two teaspoons of Worcestershire sauce and stir to distribute evenly.
Continue cooking, stirring more frequently now, until the onions are deeply golden-brown, soft, and jammy. They should be sweet with caramelized edges and almost spreadable consistency. The finished onions will have reduced to about one cup in volume. Remove from heat and set aside. The onions can be made ahead and refrigerated for up to three days.
Form and Cook the Beef Patties
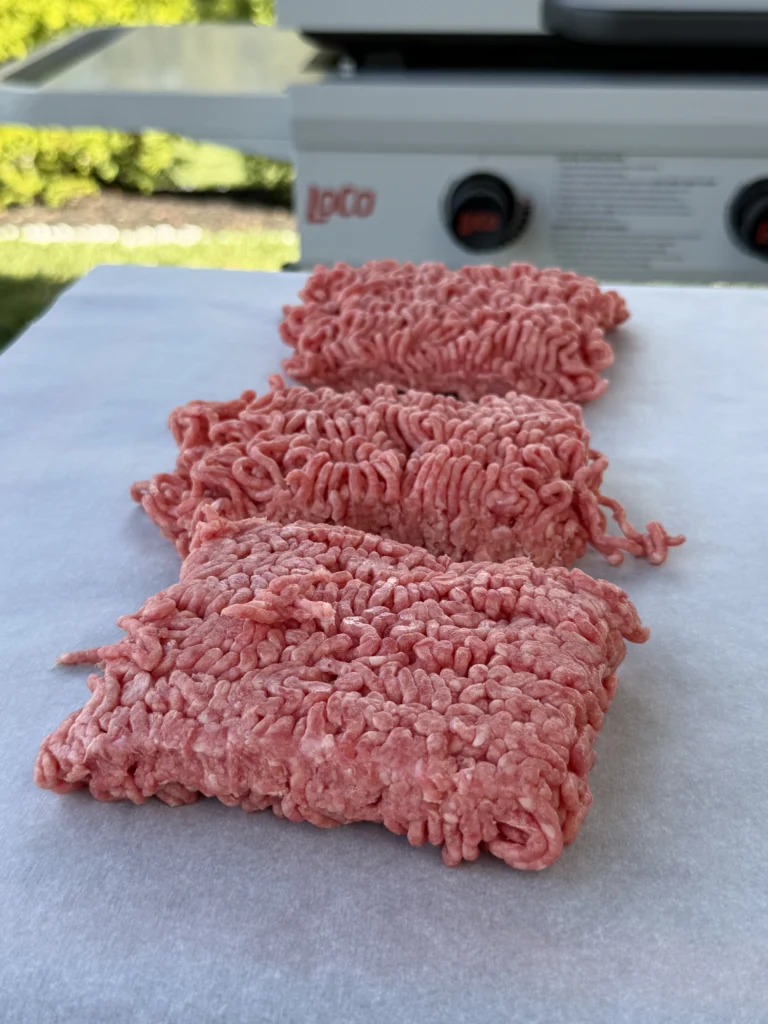
Divide the one and a half pounds of ground chuck into four equal portions of about six ounces each. Working with one portion at a time, gently form the meat into a thin patty about half-inch thick and slightly larger than your bread slices – they’ll shrink during cooking. Don’t overwork the meat or compress it too tightly, which creates dense, tough patties. The patties should just barely hold together.
Season both sides of each patty generously with kosher salt and cracked black pepper. Use more seasoning than seems reasonable – the beef can handle aggressive seasoning and much will fall off during cooking. Let the seasoned patties sit at room temperature while you heat the cooking surface.
Heat a large griddle or cast iron skillet over medium-high heat for three to four minutes until very hot. Add the patties to the hot surface – you should hear immediate, aggressive sizzling. Don’t move them once they’re down. Cook for two to three minutes on the first side until deeply browned with a crust developing around the edges. Flip the patties and cook another two to three minutes on the second side until browned and cooked through to about 160°F internal temperature.
The patties should be well-done since they’re thin and will be reheated during the final griddling of the assembled sandwiches. Transfer the cooked patties to a plate and let rest for a minute or two. The brief rest allows juices to redistribute, though with thin patties this is less critical than with thick burgers.
Assemble the Patty Melts
Lay out all eight slices of Texas toast. Spread softened butter on one side of each slice – this buttered side will be the exterior that gets griddled. Be generous with the butter as it creates the golden-brown crust and rich flavor. On the unbuttered side of four slices, spread a generous layer of the baconnaise – about two tablespoons per slice. Don’t skimp – the baconnaise is a key flavor component.
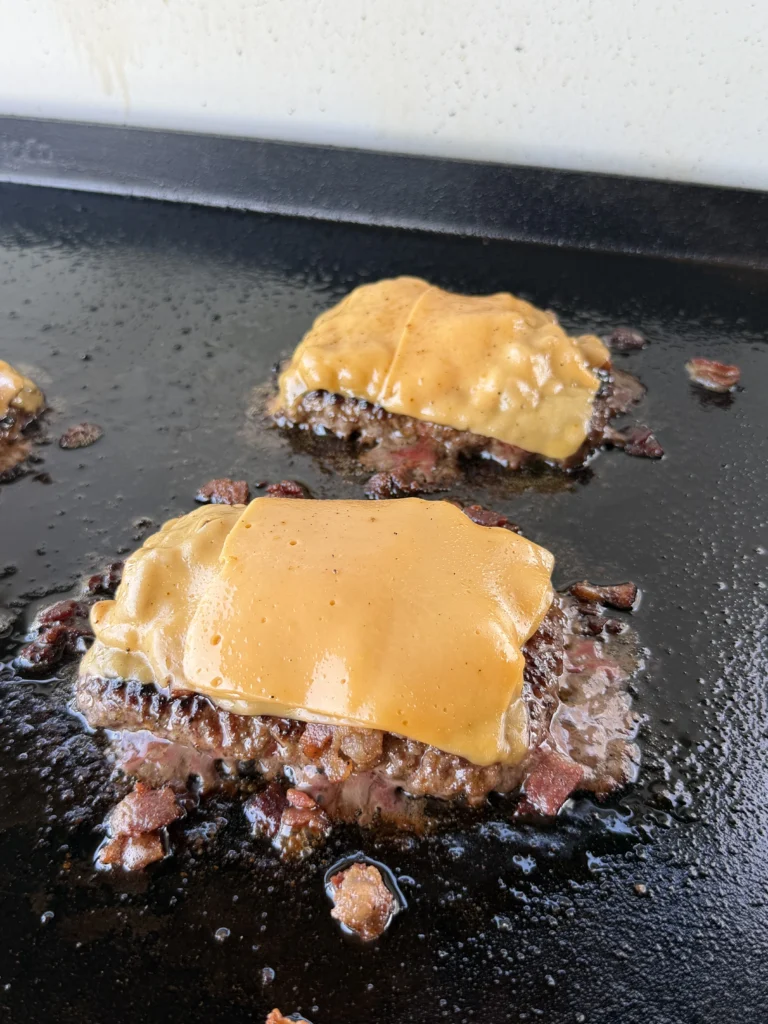
Place one slice of Swiss or American cheese on top of the baconnaise on each of the four slices. Add a cooked beef patty on top of the cheese. Season the patty with a tiny pinch more salt if desired. Spread a quarter of the caramelized onions over each patty – the onions should cover the entire surface of the meat. Place a whole crispy bacon strip on top of the onions, breaking it to fit if necessary.
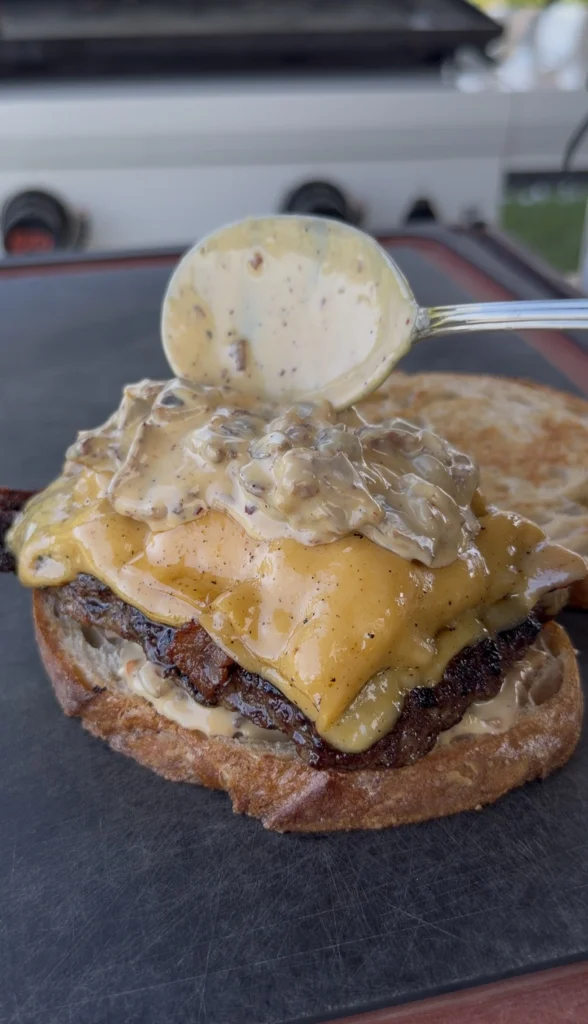
Add another slice of cheese on top of the bacon – this cheese will melt down over everything, binding the layers together. Top with the remaining four bread slices, buttered side facing out. Press down gently on each sandwich to compact the layers slightly. The sandwiches are now ready to griddle.
Griddle Until Golden and Melted
Heat a large griddle or two large skillets over medium heat. Medium heat is crucial – too hot and the bread burns before the cheese melts; too cool and the bread doesn’t crisp properly. Place the assembled sandwiches on the hot surface, working in batches if necessary to avoid crowding.
Place a heavy skillet or burger press on top of each sandwich to press it flat. This ensures good contact between the buttered bread and the hot surface while helping the cheese melt. Cook for three to four minutes without moving until the bottom is deeply golden brown. Carefully peek under one corner to check – when it’s beautiful golden-brown, it’s ready to flip.

Flip the sandwiches carefully using a large spatula, supporting the sandwich with your other hand if needed to prevent it from falling apart. Press again with the weight and cook another three to four minutes until the second side is golden brown and the cheese is completely melted. The cheese should be visibly oozing from the sides.
Remove from heat and let the patty melts rest for one to two minutes before cutting. This brief rest allows the cheese to set slightly so it doesn’t all run out when you cut into the sandwich. The rest also makes them easier to handle and less likely to burn your mouth.
Cut and Serve
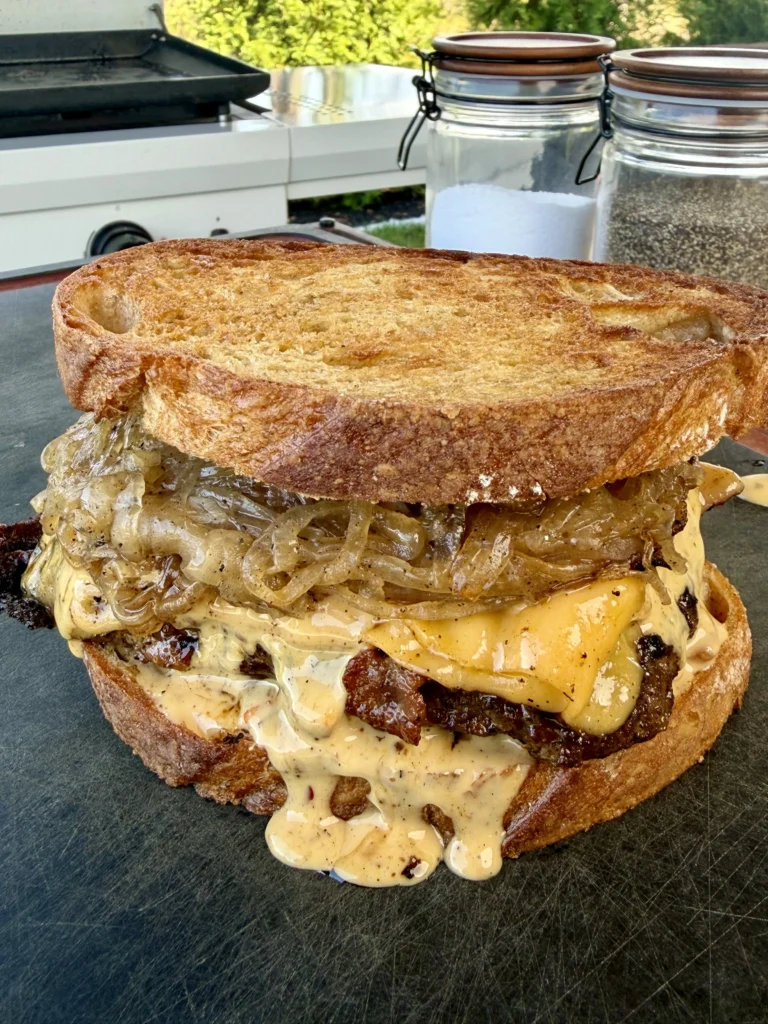
Using a sharp knife, cut each patty melt in half diagonally. The diagonal cut exposes the cross-section beautifully – you should see distinct layers of golden bread, melted cheese, beef patty, caramelized onions, and bacon. The interior should be steaming with the cheese gooey and stretchy.
Serve the patty melts immediately while hot. The bread should be crispy and golden on the outside, the cheese should be molten, and the beef should be juicy. Each bite should deliver crunchy bread, creamy baconnaise and melted cheese, savory beef, sweet onions, and smoky bacon. The flavors should be balanced – rich but not greasy, savory with sweet notes from the onions, and smoky bacon presence throughout.
FAQ
Can I make these without a mandolin?
Yes, though it’s harder to get uniformly thin slices. Use a very sharp knife and slice as thinly and consistently as possible. Thicker slices take longer to caramelize and may not soften completely, but they’ll still be delicious. Consider buying pre-sliced caramelized onions from the store if slicing is challenging – not as good as homemade but an acceptable shortcut.
What if I don’t like Swiss cheese?
American cheese is the classic alternative that melts beautifully. Provolone, white cheddar, or pepper jack all work well too. Avoid cheeses that don’t melt smoothly like fresh mozzarella or crumbly cheeses like feta. The cheese needs to melt completely and bind the sandwich together, so good melting properties are essential.
Can I use regular bacon instead of thick-cut?
Regular bacon works but thick-cut provides better texture and presence in the sandwich. Regular bacon can get too crispy and shatter into sharp pieces that are hard to bite through. Thick-cut bacon maintains some chew while being crispy enough to provide crunch. If using regular bacon, you may want two strips per sandwich instead of one.
How do I prevent the patty melts from falling apart?
Press them firmly with a spatula or burger press during cooking to compress the layers. Let them rest one to two minutes after cooking before cutting so the cheese sets slightly. Cut with a sharp knife in one confident motion rather than sawing back and forth. The baconnaise acts as a binder that helps hold everything together, so don’t skip it.
Can I make components ahead of time?
Yes, this is a great make-ahead meal. The baconnaise keeps refrigerated for five days. Caramelized onions keep for three days refrigerated. Cook the bacon ahead and reheat in the microwave or on the griddle. Form the patties and refrigerate for up to a day. With these components ready, final assembly and griddling takes only ten minutes.
Conclusion
Baconnaise patty melts prove that layering bacon flavor throughout a sandwich creates more interesting results than just piling on strips. The homemade baconnaise incorporates finely chopped bacon into creamy spread that provides smoky richness in every bite, while cooking the onions in bacon grease adds another dimension of pork flavor. Combined with whole bacon strips, the sandwich delivers bacon presence without being greasy or one-note. The 80/20 ground chuck provides the juicy, beefy foundation while mandolin-sliced caramelized onions add sweet complexity.
What makes this bacon patty melt recipe so successful is how each component serves a specific purpose. The thin patties cook quickly while staying juicy, the Texas toast provides substantial structure that won’t get soggy, the double layer of cheese creates gooey richness, and the butter-griddled exterior provides golden-brown crispness. The assembly order matters too – cheese directly on bread prevents sogginess while cheese on top of the patty melts down over everything.
These patty melts with homemade baconnaise work beautifully for weekend lunches, game day gatherings, or any time you want comfort food that feels special. The technique is straightforward enough for beginners but delivers results that taste like you spent hours in the kitchen. Master the basics – properly caramelized onions, crispy bacon, and patient griddling – and you’ll have a signature sandwich that consistently impresses.
If you’re looking for more recipes , click the link! Check out all of our grilling recipes here for more steak, seafood, and BBQ favorites that are perfect for your next cookout.
COMMON ITEMS USED IN THESE RECIPES
Hasty Bake Charcoal Grill and Smoker
Knitted Gloves
Food Processor
Cast Iron Skillet
Meater +
Upgrade Your Meat Game with Grill Nation x Linz Heritage Angus
If you really want to take your grilling and cooking to the next level, you need to check out our collaboration with Linz Heritage Angus. We’ve partnered with them to bring you some of the best beef you can get your hands on.
Linz Heritage Angus isn’t your typical grocery store meat. These guys are the real deal – they raise their cattle the right way, and you can taste the difference in every bite. We’re talking about beef that’s been dry-aged to perfection, with marbling that makes your mouth water just looking at it.
Check out these premium cuts that’ll change how you think about beef:
Premium Ribeye Steaks – Perfect for special occasions
Dry-Aged Beef Selection – Take your grilling to the next level
Ground Beef & Burger Blends – The foundation of great BBQ
Use code GN15 at checkout for 15% off your first order. Trust me, once you try Linz Heritage Angus, you’ll never want to go back to regular store-bought beef.