


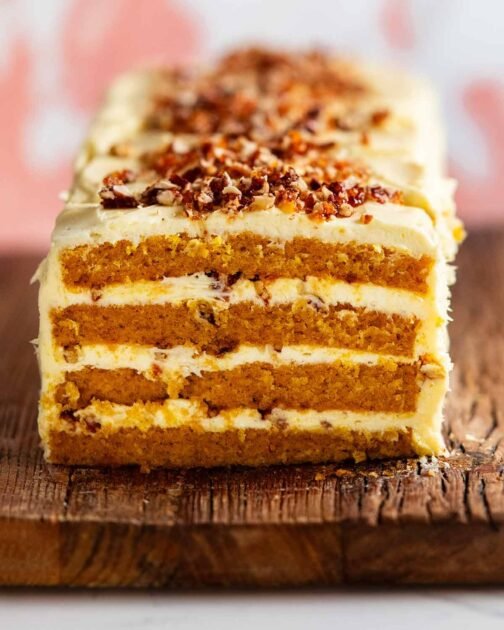
A big-format Pumpkin Layer Cake sandwiched with a not-too-sweet cream cheese frosting, littered all the way through (and on!) with the sparkle and crunch of crushed toffee pecans. If you need me, I’ll be in the fridge with a fork!

A big four-layer Pumpkin Cake!
This is the sort of cake you make for gatherings but secretly hope to keep under a dome all week (not that any dome is big enough for this), cutting yourself slivers whenever the craving strikes.
We are talking four soft layers of cinnamon pumpkin cake, each smothered with a cream cheese frosting that’s softly creamy and tangy rather than cloying, with a sprinkle of finely chopped toffee pecans in every layer for some welcome textural contrast and addictive pops of nutty sweetness.
There is a good amount of frosting in every single bite, so you’ll be extra happy to discover that it’s not too sweet with less than half the sugar of traditional cream cheese frostings.

And it’s BIG!
40cm/15″ long, 8cm / 3.2″ high and weighs 2.5kg (5 lb).
Cut into 16 thick slices for serious cake monsters, 20 regular servings, up to 48 in petit four form which rapidly became one of my favourite things about this cake. More on this below!


Ingredients
There are 3 parts to this cake:
The pumpkin cake layers – based on my Pumpkin Cake recipe.
Cream cheese frosting
Toffee pecans
1. Pumpkin PUREE OPTIONS for the cake
I use fresh because canned pumpkin isn’t easy to find in Australia, it tastes better and takes 8 seconds to puree. 🙂 But canned works perfectly fine!

2. OTHER CAKE INGREDIENTS
I’ve tried using more spice combinations in the past, but I keep coming back to just plain cinnamon. I like that it compliments rather than overwhelms the pumpkin flavour. Simple is best!

Flour – Plain / all-purpose flour. I don’t recommend using self-raising flour (also called self-rising flour) as the flour-to-baking-powder ratio used in this recipe is specifically to ensure the cake rises flat rather than doming.
Oil – Any neutral-flavoured oil such as canola or vegetable. Using oil instead of butter keeps the cake moist because butter firms up at room temperature, while oil stays liquid. That’s why oil-based cakes stay softer for longer. The trade-off, of course, is flavour – butter always wins on that front! But in this cake, the pumpkin and cinnamon bring enough that I don’t miss the butter one bit.
Baking powder – Our rising agent, though I use slightly less than in the Pumpkin Cake (3 rather than 4 teaspoons) so the cake comes out flat rather than with a dome.
Cinnamon – For flavour! Pumpkin’s best friend!
Sugar – Regular white sugar or caster/superfine sugar both work.
Eggs – Large eggs (55–60g / 2 oz each), at room temperature. Room temperature eggs blend better into the batter, giving you a smoother, more even crumb. (More on the right eggs for baking here!)
Salt – Just a touch to enhance the flavours. Standard inclusion in sweet recipes these days. 🙂


3. toffee pecans

White sugar – The base of the toffee, it melts into a golden, caramelised coating that hardens as it cools. Just regular white sugar, though caster sugar / superfine will also work just fine.
Pecans – My nut of choice, because it’s a classic pairing with pumpkin cake!
Salt – Not trying to make salted toffee here, but just enough to ensure the toffee does not taste tooth-achingly sweet. It is quite amazing how salt can dial down sweetness!


4. cream cheese frosting
Yes, you need two whole blocks of cream cheese frosting! I didn’t want a buttercream masquerading as a cream cheese frosting today, I wanted a frosting where cream cheese is front and centre because that slight tang just goes so well with pumpkin cake!
Also, dialling up the cream cheese is the reason why I was able to dial down the sugar to half the amount typically used in cream cheese frosting. 🙂

Cream cheese – Use block cream cheese, not the spreadable kind that comes in tubs (it’s too soft). If spreadable is all you can get, add a little extra icing sugar to firm up the frosting.
Unsalted butter – Softened to a pliable state, but not overly soft or starting to melt.
Icing sugar (powdered sugar) – 🇦🇺 In Australia, use soft icing sugar, not pure icing sugar (that one’s for things like royal icing, which sets hard).
Vanilla extract – For a touch of warmth and flavour.
Salt – To bring out flavours and also, it dials down the sweetness a bit.
How to make Pumpkin Layer Cake
There’s a few components to this recipe but none of them are tricky. You can also make all components the day before then assemble the next day, if you feel like breaking up the process or if you stuffed up your schedule and ran out of time to finish it (who me? 😊).
1. Pumpkin cake layers
It’s fine if your trays are slightly smaller, your cake layers will just be thicker and you’ll have a taller cake. I don’t recommend using larger though as the cake layers will be too thin.
This recipe can also be made in 20cm / 8″ or 23cm / 9″ pans to make 4 layer round cakes.

Line trays – Lightly spray or grease two trays then line with baking paper / parchment paper. I use standard jelly roll pans – 38 × 25 cm / 10 x 15″ that are 2.5 cm / 1″ deep (the cakes are 1.5cm / 0.6″ thick.
Wet ingredients – Whisk the wet ingredients in a large bowl.

Dry ingredients – Add the dry ingredients into the same bowl and whisk until incorporated.
Divide the batter between each tray. Spread to the corners then assertively bang the pan on the counter to spread the batter as evenly as possible (it’s too thick to tilt/spread).

Bake for 15 minutes in at 180°C/350°F oven, or until a toothpick inserted into the middle comes out clean.
Cool in the pan for 10 minutes, then invert onto cooling racks. Fully cool before use.
If storing overnight, cover the surface with baking paper before wrapping with cling wrap as the surface is tacky. Keep in the refrigerator.
2. pecan toffee crumble
My failsafe toffee tips – melt low and slow, use a chopstick to stir rather than a spatula and take it off the stove when it’s pale golden as it will get darker as you toss the pecans. Nobody likes burnt toffee!
(PS If you’re wondering why I use a chopstick – I find it stirs more gently for a more even melt and there’s less surface area for toffee to get stuck to.)

Roast the pecans for 10 minutes in a 180C/350F (160C fan-forced) oven. This step really brings out the pecan flavour so don’t skip it! Let cool on the tray for at least 5 minutes before using.
Make toffee – Spread the sugar in an even layer in a large saucepan over medium heat.

Stir – After 2 minutes or so, you will see the edges melt into a clear sugar syrup. Gently stir using a chopstick (or similar, something thin with minimal surface area) then let the sugar continue melting, stirring two or three more times.
Toffee colour – Once fully melted, let it become a light amber colour then take it off the stove.

Work fast! Add the pecans and salt. Use a rubber spatula to coat in the toffee.
Spread the pecans in a single layer on a baking paper lined tray as best you can. The toffee starts to hard quickly so it can be a battle! But don’t worry if you have pecan clumps, a thinner layer is just easier to chop than giant mounds of hard pecan toffee, and cools faster too.

Cool fully then break up into large chunks by hand.
Chop – Use a knife to chop the toffee pecans. I chop about half pretty finely (I get a fair amount of “dust” which I love!) for use inside the layers. Then I chop the rest marginally larger to use for decorating and serving. Larger pieces inside the cake get in the way of slicing, I find. Toffee is hard!
Resist eating by the handful (it is candy, after all!) and set aside for assembling.
3. Not-too-sweet cream cheese frosting

Beat the cream cheese and butter for 2 minutes on high until creamy and fluffy, scraping down the sides as needed. a minute on high until creamy.
Fluff it! Then add the icing sugar (powdered sugar) in 3 batches, starting the beater on low to avoid a snowstorm. Once it’s incorporated, add the vanilla and salt. Crank the beater up to high and beat for 1 minute until the frosting is fluffy.
Use immediately or refrigerate until required, even overnight. If it’s in the fridge for more than 30 minutes and the frosting becomes hard, leave it out to come to room temperature then give it a fast and furious beat to re-fluff.
4. ASSEMBLE
Top tip: assemble on the platter you intend to serve this cake on. Avoid having to move this once assembled!

Cut each cake into half lengthways, then trim as needed so you have four equal pieces.
For ease of handling (moving around etc), once I have cut the cake I cover each piece with a separate piece of baking paper, then invert onto the cool rack (so the paper acts as a sling to transfer the cake around as needed).
Place a piece of caking on a serving platter. Spread with one-fifth of the frosting. Sprinkle with 1/4 cup of the finely chopped pecans and dust.
Frosting rationing – I use one-fifth of the frosting between each layer, then two-fifths on the top and sides.

Repeat twice more, then place the final cake layer on top. Take care when handling the cake layers to avoid breaking! Use the paper then invert, or use long kitchen utensils to support the cake pieces, like two offset spatulas, long knives or even rulers.
If you start getting a Leaning Tower of Pisa situation, just nudge and press to make the stack as even as possible. I have been known to shove bits of toffee pecans between layers to “prop” up sagging sections. Do it now before you start frosting the top and sides – else it gets messy!
Frost the top and sides with the remaining cream cheese frosting. Sprinkle the top with pecan crumble (I use some of the larger pieces here as I think it looks nicer). Refrigerate for an hour – this helps stabilise the cake – the cut slices as thick as you dare, and serve!


Some logistical matters
I don’t ordinarily close a post with a section on cake logistics, but I feel like it’s got a place here because this is a bit of a large, statement cake that calls for a bit more effort than simple one-bowl cakes. 🙂 So here we go!
It can serve 48 – The cake cuts into 48 tall petit four size pieces that are ideal for passing around as an after dinner treat! Each piece is roughly 4 x 4 x 8 cm tall (1.6 x 1.6 x 3.2″). The cake is actually quite rich so honestly, most people would probably find that piece sufficient for dessert, especially if the main was substantial.
Though actually, it could have the opposite effect and start a stampede as people try to grab seconds and thirds before it’s all gone! 🤣

Think about storage and transportation! This is a long cake – 40cm/15″ long, 8cm / 3.2″ high and weighs 2.5kg (5 lb). It is formidable!! 🙂 If you don’t have a tupperware container large enough, stick skewers in the cake as support poles for a foil tent, then for extra security wrap that in cling wrap.
Getting ahead with the cake – The cake has an excellent shelf life of 5 days because it’s made with oil rather than butter. So you can make the cake well ahead and keep it in the fridge until you’re ready to assemble.
Making the frosting ahead – The frosting can be made even two days before and kept in the bowl until required. Just take it out of the fridge and let it soften on the counter (about an hour, depending on how warm/cold your kitchen is) then give it a swift-and-furious beat to re-fluff (about 1 minute). Then use per recipe.
And lastly, one of my favourite features about this cake (don’t judge me!) is that it’s terrific eaten cold, straight out of the fridge. The cake stays soft, the frosting stays creamy, and you can skip the dreaded 30-minute wait for buttercream to thaw from rock-hard to edible – it kills me every time!
Hope you enjoy! – Nagi x
Watch how to make it
Hungry for more? Subscribe to my newsletter and follow along on Facebook, Pinterest and Instagram for all of the latest updates.

A Pumpkin Layer Cake with Cream Cheese and Toffee Pecans
Ingredients
Pumpkin puree options – CHOOSE ONE
Cake wet ingredients
Cake dry ingredients
Not-too-sweet cream cheese frosting
Pecan toffee crumble
Instructions
Pumpkin cake layers
Assembling
Toffee pecan crumble
Not-too-sweet cream cheese frosting
Recipe Notes:
Nutrition Information:
Life of Dozer
As I’m writing today’s recipe – perfectly positioned for maximum sunlight and minimum effort!