
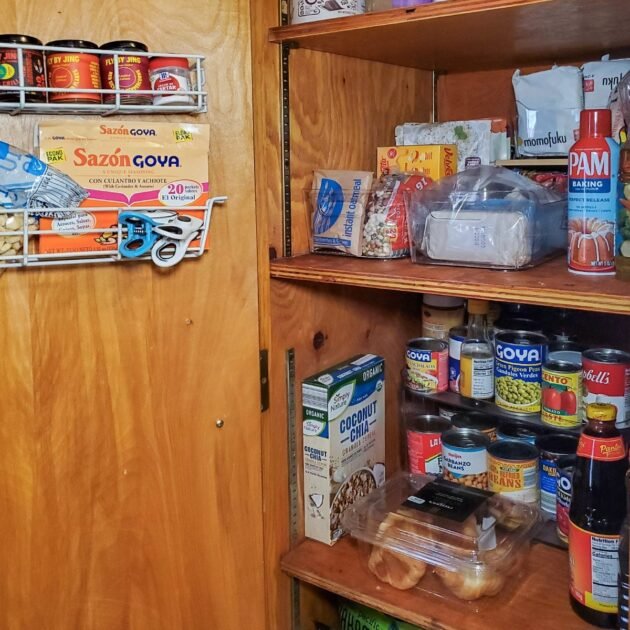
We have all been there: you open your pantry door intending to bake a quick batch of cookies, only to be met by a literal avalanche of half-open pasta boxes and stray bags of flour. When your kitchen cupboards become a “wild west” of ingredients, the sheer visual clutter can trigger enough anxiety to make you close the door and order takeout instead.
A disorganized pantry doesn’t just look bad; it actively drains your time and your budget. When you cannot see what you own, you end up buying three bags of oats you don’t need while failing to find that one bottle of vanilla hidden in the shadows. To fix this, I consulted three professional organizers to learn how to turn a cluttered mess into a functional, high-end space for under $.
The Power of the Reset
The first step in any kitchen transformation is a total “cull.” You must take everything out—yes, every single item—to see what you are actually working with. This is the moment to check expiration dates and toss the duplicates that have been hiding in the back.
Once the shelves are bare, measure your space meticulously. Most people fight against tall, narrow shelves, but knowing your dimensions allows you to shop for products that utilize every inch of vertical space. Before putting anything back, wipe down the shelves or replace old contact paper for a fresh, professional slate.
Establishing Your Flavor Zones
According to the experts, the secret to a pantry that stays tidy is “zoning.” Instead of shoving items wherever they fit, group them by how you actually use them. I organized my space into these key categories:
Baking Essentials: Flour, sugar, extracts, and sprinkles.
Baking Essentials: Flour, sugar, extracts, and sprinkles.
Ready-to-Eat: Grab-and-go snacks and breakfast items.
Ready-to-Eat: Grab-and-go snacks and breakfast items.
Bulk & Backstock: Large bags of rice or Costco duplicates kept on the highest shelves.
Bulk & Backstock: Large bags of rice or Costco duplicates kept on the highest shelves.
Sauces & Seasonings: Oils, vinegars, and spices that usually get lost.
Sauces & Seasonings: Oils, vinegars, and spices that usually get lost.
Essential Budget Tools
You do not need a designer’s budget to get a high-end look. I prioritized four specific tools from Amazon that cost about $ each or less:
. Clear Bins: Visibility is everything. Medium-sized clear bins allow you to group “like” items—like all your pasta types—so you can slide the whole category out at once.
. The Lazy Susan: A rotating turntable is a game-changer for deep corners. It ensures that oils and condiments never get pushed to the back to die an undignified death.
. Hanging Baskets & Risers: If your shelves are tall, you are wasting space. Metal hanging shelves or wooden risers create “mini-shelves” for smaller items like spice jars or pet treats, doubling your storage capacity instantly.
Smart Shopping and Repurposing
If your budget is tight, look closer to home before hitting the stores. Sturdy shoe boxes or even cut-down shipping boxes can be used to contain zones within a drawer. Simple masking tape and a marker can serve as labels until you are ready to upgrade to a more aesthetic system.
The most important rule? Identify your specific “pain points.” If you spend five minutes every morning hunting for coffee pods, that is where you should invest your first $. Spend your money on the solutions that save you the most time during your daily routine.
Maintaining the Method
An organized pantry is a living system. Experts recommend a quick “refresh” every three months to remove anything that has expired and to reset your zones. By leaving a little extra space for seasonal items—like that autumn canned pumpkin—you ensure the system won’t collapse the next time you go grocery shopping.
Tidying your pantry is about more than just aesthetics; it is about clearing the mental space to enjoy your kitchen again. When every ingredient has a home, you’ll find yourself reaching for the flour and whisk far more often than the delivery app.