

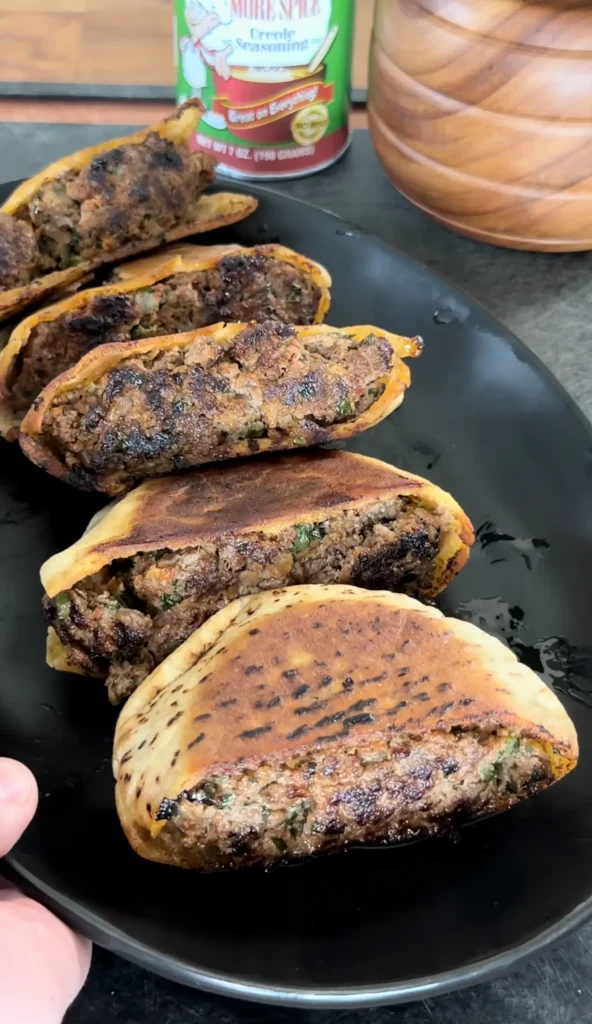
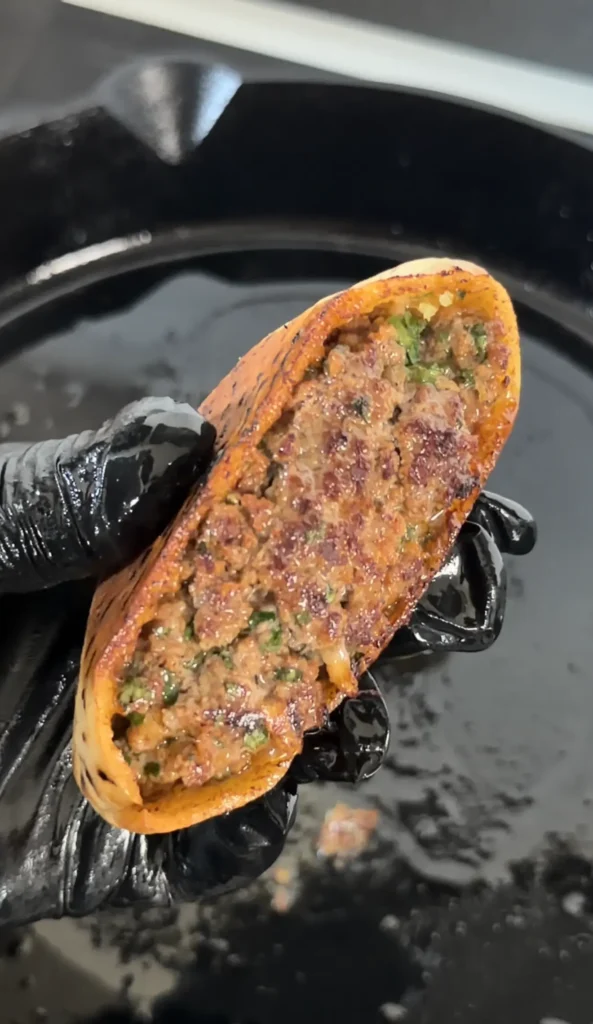
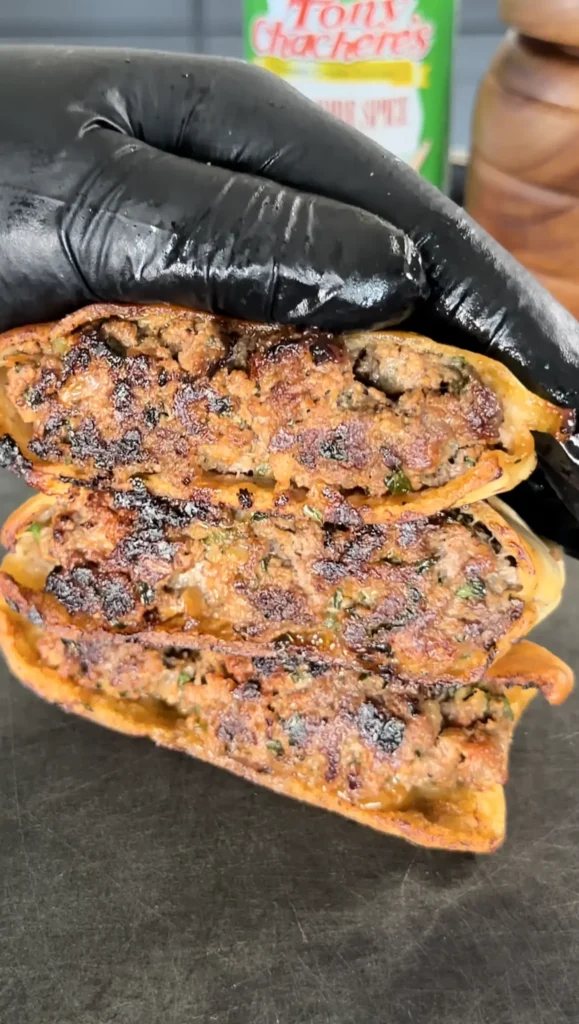
Arayes are Middle Eastern stuffed pita pockets filled with seasoned ground beef and grilled until crispy and golden brown. You split pita bread in half to create pockets. Spread thin layers of raw seasoned meat inside each pocket. Brush the outside with oil or butter. Then grill them on medium heat for 3 to 4 minutes per side until the pita crisps and the meat cooks through. This Tony’s arayes version adds Cajun flair with Tony Chachere’s seasoning in the beef filling and a garlic butter finish.
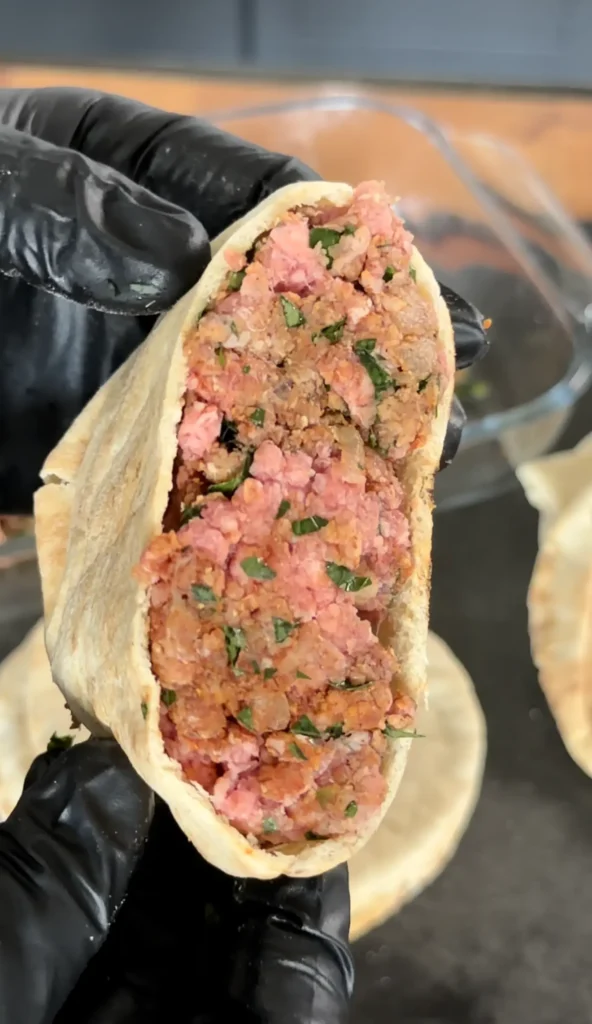
The meat mixture combines 80/20 ground beef with Tony’s, garlic powder, onion powder, smoked paprika, and tomato paste. Fresh parsley, diced onion, and lemon juice add brightness. Some versions include cheese for extra richness. The filling stays raw when you stuff the pitas. It cooks inside the pocket as you grill, creating juicy, flavorful meat surrounded by crispy bread.
These crispy stuffed pita pockets come together in under 20 minutes from start to finish. Mix the filling in 5 minutes. Stuff the pitas in 3 to 4 minutes. Grill in 8 to 10 minutes total. The garlic butter finish takes 1 minute. You can use a grill, griddle, flat top, or even a pellet smoker. The result is restaurant-quality Middle Eastern street food with bold Cajun seasoning.
What Makes Arayes Different from Regular Stuffed Pitas
Arayes differ from regular stuffed pitas because you fill them with raw meat that cooks inside the bread during grilling. Most stuffed pitas use pre-cooked fillings like falafel, chicken shawarma, or gyro meat. These get assembled cold or warm and eaten immediately. Arayes require cooking after assembly. The grilling process crisps the pita while cooking the meat.
The meat filling in arayes is spread thin throughout the entire pita pocket. It’s not chunky or loose like traditional pita fillings. You mix raw ground beef with seasonings and spread it like a paste. This creates even distribution from edge to edge. Every bite contains meat and crispy bread in the same proportion.
Traditional Middle Eastern arayes originated in Lebanon and Palestine. They’re popular street food throughout the Levant region. Classic versions use lamb or beef with Middle Eastern spices like allspice, cinnamon, and pine nuts. This Tony’s version adapts the concept with Cajun seasonings familiar to American BBQ. The technique remains authentic while the flavor profile shifts.
The cooking method defines arayes more than the specific filling. You must grill or griddle them with direct heat. This creates the signature crispy, charred exterior. Baking doesn’t work as well. It dries out the bread without creating that essential crunch. The direct contact with hot metal caramelizes the outside beautifully.
Some restaurants serve arayes as appetizers cut into triangles. Others serve them as main courses whole or halved. They work for any meal. The portable format makes them perfect for parties, game days, or quick dinners. Kids love them because they’re essentially grilled meat sandwiches in a fun format.
Why 80/20 Ground Beef Works Best for Arayes
80/20 ground beef creates the best arayes because it provides enough fat to keep the meat juicy while it cooks inside the pita. The 20% fat ratio ensures moisture throughout the thin layer of filling. Leaner beef like 90/10 or 93/7 dries out when spread thinly and grilled. The meat has nowhere to hide. A thin layer needs fat to stay tender.
The fat also helps bind the filling together inside the pita pocket. As it cooks, the fat melts and redistributes throughout the meat. This creates cohesive texture that doesn’t crumble into loose bits. Lean ground beef can fall apart into dry granules. The fat acts as a natural binder that holds everything together.
Fat carries flavor better than lean protein. All your seasonings dissolve into the fat as the meat cooks. Tony’s seasoning, garlic powder, smoked paprika, and other spices need fat to distribute evenly. The melted fat coats every bit of meat with seasoned flavor. Lean beef can taste under-seasoned even with the same amount of spice.
The fat content also affects how the pita crisps. Some rendered fat escapes from the meat and soaks into the inner layers of the pita. This creates richness and helps those inner layers crisp up. Think of it like grilling a quesadilla where the cheese fat makes the tortilla golden. The same principle applies here.
Ground beef leaner than 80/20 requires adding oil or butter to the filling to compensate. This works but doesn’t taste as good as natural beef fat. If you must use lean beef, add 2 to 3 tablespoons of olive oil to the mixture. This provides the missing moisture and fat content.
How to Spread Filling Evenly in Pita Pockets
Spreading the meat filling evenly in pita pockets requires patience and the right technique. The goal is a thin, uniform layer about ¼ inch thick that reaches from edge to edge. Uneven filling creates problems. Thick spots stay raw while thin spots overcook. The pita burns in areas without meat protection.
Start by cutting each pita in half to create two pockets. Use a sharp knife and cut straight through. Some pitas come pre-cut. Either way, you end up with semi-circular pockets. Gently open each pocket without tearing the bread. Pitas can be delicate. Work carefully around the edges.
Divide your meat filling into 12 equal portions for 6 whole pitas (12 halves). Eyeballing works but using a scale ensures consistency. Each portion should be about 1.5 to 2 ounces of meat. Having pre-portioned filling makes the stuffing process faster and more even.
Use a small offset spatula or butter knife to spread the filling inside. Work from the center toward the edges. Press gently to avoid tearing the pita. The filling should cover the entire interior surface. Leave a very small border (about ¼ inch) around the edge if you want, but filling to the edge creates better coverage.
After spreading the filling, press the stuffed pita flat with your hands. This compresses the filling into an even layer and removes air pockets. Air pockets cause uneven cooking. The pita should feel uniformly thick when you press it. If you feel lumps or thick spots, open it carefully and redistribute the meat.
Wet or oily hands make spreading easier. The meat mixture contains oil and lemon juice which helps. If your filling seems too dry and won’t spread smoothly, add another tablespoon of olive oil. Too-dry filling clumps instead of spreading like a paste.
Some cooks add an egg to the meat mixture as a binder. This creates a more paste-like consistency that spreads easily. Use one egg for every pound of meat. The egg helps hold the filling together but isn’t traditional. It’s a modern adaptation that solves the spreading problem.
The Best Cooking Methods for Crispy Arayes
Grilling arayes on a gas or charcoal grill over medium heat creates the most authentic results with char marks and smoke flavor. Preheat the grill to medium heat, around 350°F to 375°F. Place the brushed arayes directly on the grates. Close the lid and cook for 3 to 4 minutes. Flip and cook another 3 to 4 minutes until both sides are golden with visible char marks.
A flat top griddle or large skillet produces the crispiest results with even browning. Heat the griddle to medium heat. Add the arayes and press down gently with a spatula. The direct contact with the flat surface creates maximum crispness. Cook 3 to 4 minutes per side, pressing occasionally. The entire surface browns evenly without grill marks.
Pellet smokers like the Pit Boss Navigator create unique smoky flavor using a two-step method. Set the smoker to 350°F and cook the arayes for 10 to 12 minutes to infuse smoke flavor. The meat cooks through during this phase. Then crank the heat to 400°F to 450°F and crisp each side for 2 to 3 minutes. This gives you smoke flavor plus crispy texture.
Cast iron skillets work excellently for indoor cooking. Heat a large cast iron skillet over medium heat until hot. Add the arayes and press gently with a second skillet or grill press. Cook 3 to 4 minutes per side. The heavy cast iron distributes heat evenly and creates beautiful browning. You can cook 2 to 3 at a time depending on pan size.
Outdoor griddles like Blackstone create restaurant-quality results with ample cooking space. Preheat the griddle to medium heat. Cook as many arayes as fit comfortably without crowding. The large flat surface makes it easy to cook a full batch at once. This is ideal for parties or feeding groups.
Avoid baking arayes in the oven. Oven heat is indirect and dries out the pita before it crisps. The texture becomes hard and brittle rather than crispy and golden.
Tony’s Arayes
Crispy Stuffed Pita Meat Pockets with Cajun Spice
Ingredients
Meat Filling
For the Pitas
For Tony’s Garlic Butter
Optional Dipping Sauce
The key to perfect arayes is spreading the meat filling thin, about ¼ inch thick inside the pita. Thin filling cooks through quickly and crisps the pita before the bread burns. Thick filling stays raw inside while the pita overcooks. Press the filled pitas flat before grilling to ensure even thickness throughout.
Step-by-Step Instructions
Step 1: Make the Meat Filling
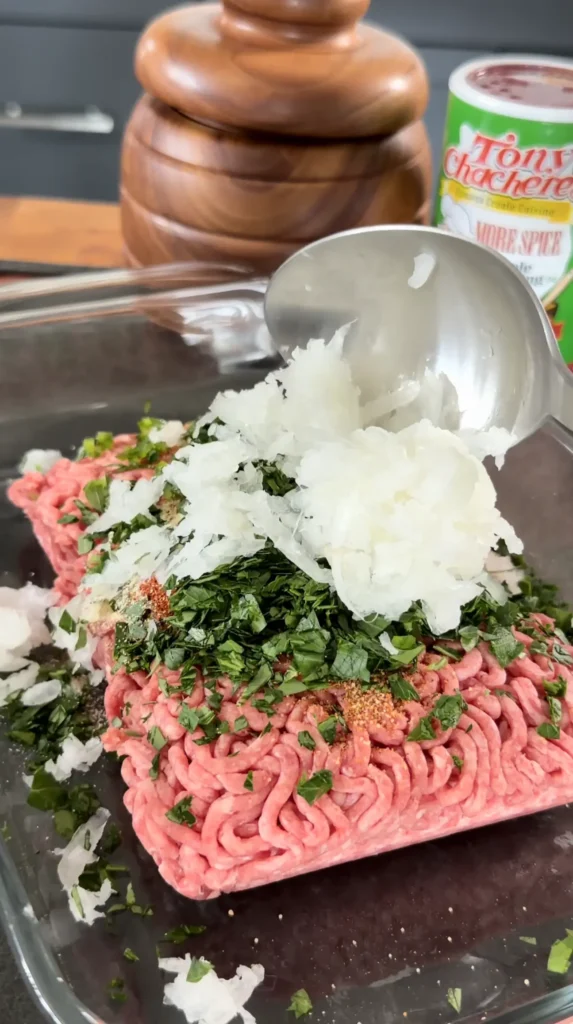
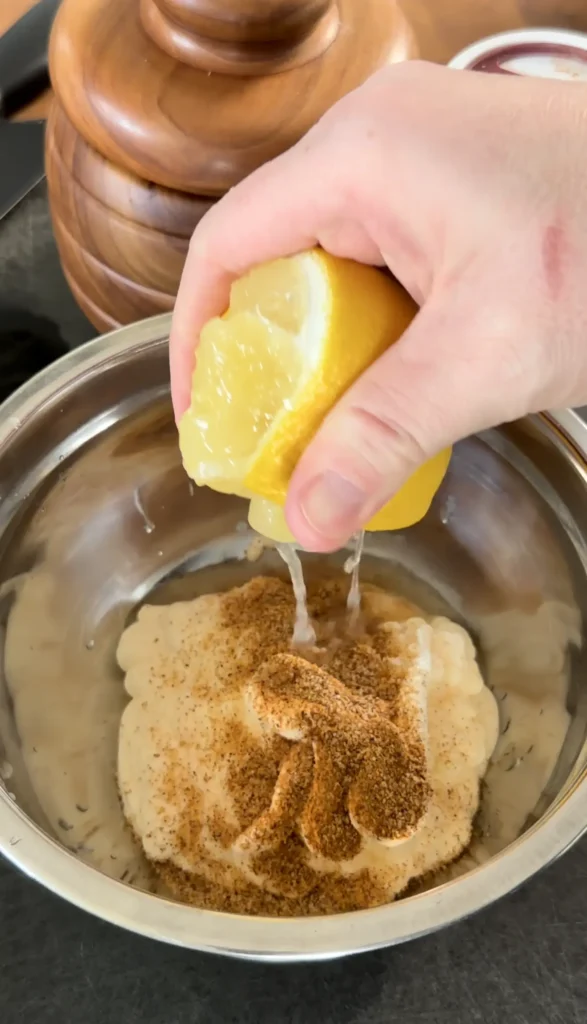
In a large bowl, combine 1 pound ground beef (80/20), 1 tablespoon Tony Chachere’s, 1 teaspoon garlic powder, 1 teaspoon onion powder, 1 teaspoon smoked paprika, ½ teaspoon cumin if using, ½ teaspoon black pepper, 1 tablespoon tomato paste, 2 tablespoons chopped parsley, ¼ cup finely diced onion, minced jalapeño if using, 1 to 2 tablespoons olive oil, and 1 tablespoon lemon juice.
If adding cheese, mix in 1 cup shredded mozzarella or pepper jack. The cheese melts inside as the arayes cook, creating gooey pockets.
Use your hands or a fork to mix everything until just combined. Don’t overwork the meat. Overmixing creates dense, tough filling. Mix until the seasonings distribute evenly and the meat holds together when pressed. The mixture should look uniform with visible specks of herbs and onion throughout.
The filling should feel slightly wet from the oil and lemon juice. If it seems too dry and crumbly, add another tablespoon of olive oil. If too wet and loose, add 2 tablespoons breadcrumbs to absorb excess moisture. The ideal consistency spreads easily but holds its shape.
Step 2: Prepare the Pitas and Portion the Filling
Cut 6 pita breads in half to create 12 pockets. Use a sharp knife and cut straight through the middle. Gently open each pocket with your fingers. Work carefully to avoid tearing the bread. Set the opened pockets on your work surface.
Divide the meat filling into 12 equal portions. Each portion should be about 1.5 to 2 ounces. You can eyeball this or use a kitchen scale for precision. Having pre-portioned filling makes stuffing faster and ensures consistent results.
Step 3: Stuff the Pita Pockets
Take one portion of filling and place it inside a pita pocket. Use your fingers or a small spatula to spread it evenly throughout the interior. Work from the center toward the edges. Aim for a thin layer about ¼ inch thick. Make sure the filling reaches all the way to the edges of the pocket.
After spreading, press the stuffed pita flat between your hands. This compresses the filling into an even layer. Feel for thick spots or air pockets. Redistribute if needed. The stuffed pita should feel uniformly thick throughout.
Repeat with the remaining pitas and filling. Work in assembly-line fashion for efficiency. Stuff all 12 halves before moving to the next step.
Step 4: Brush with Oil and Preheat Cooking Surface
In a small bowl, mix 2 tablespoons olive oil or melted butter. Use a silicone brush to coat both sides of each stuffed pita. Make sure the entire surface gets a light coating. This prevents sticking and promotes even browning.
Preheat your grill, griddle, or skillet to medium heat (350°F to 375°F). For grills, preheat with the lid closed for 10 minutes. For griddles and skillets, heat for 3 to 5 minutes until hot. Test the heat by flicking water drops on the surface. They should sizzle and evaporate immediately.
Step 5: Cook the Arayes

Place the brushed arayes on the hot cooking surface. Don’t crowd them. Leave at least ½ inch between each one for heat circulation. For grills, close the lid. For griddles and skillets, leave them open.
Cook without moving for 3 to 4 minutes. The bottom should turn golden brown with darker brown spots (or grill marks if grilling). You should smell the meat cooking and see the edges of the pita browning.
Use tongs or a thin spatula to flip each araye. Cook the second side for another 3 to 4 minutes until golden brown and crispy. The pita should feel crisp when you press it gently. The meat should be cooked through to 160°F internal temperature.
For pellet smoker method: Cook at 350°F for 10 to 12 minutes with the lid closed. The meat will cook through during this time. Then increase heat to 425°F to 450°F. Flip the arayes and crisp each side for 2 to 3 minutes until golden and crispy.
Step 6: Make Tony’s Garlic Butter
While the arayes cook, melt 4 tablespoons butter in a small saucepan or microwave. Stir in ½ teaspoon Tony Chachere’s, ½ teaspoon garlic powder, and a pinch of chopped parsley. Mix until combined.
Keep the garlic butter warm until the arayes finish cooking. You want it liquid and hot when you brush it on.
Step 7: Finish with Garlic Butter and Serve
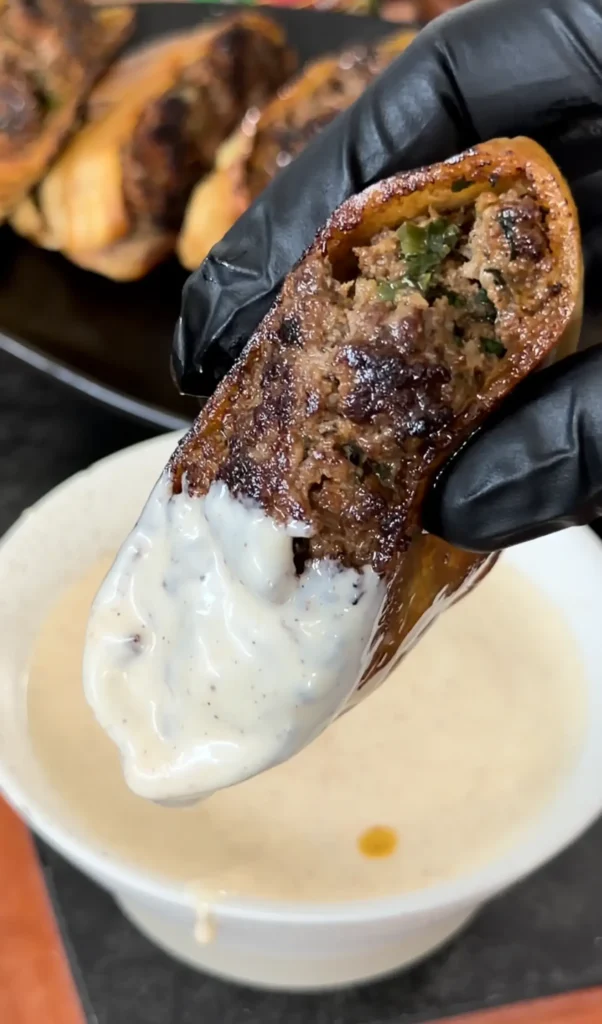
When the arayes come off the grill, immediately brush both sides with the Tony’s garlic butter while they’re still hot. The hot pita absorbs the seasoned butter beautifully. This creates rich flavor and adds extra moisture.
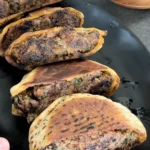
Transfer the Tony’s arayes to a serving platter. Cut each half into triangles if serving as appetizers, or leave whole for main course portions. Serve immediately while hot and crispy.
Serve with dipping sauce if using. The Cajun garlic sauce complements the Tony’s seasoning in the meat. Garnish the platter with extra chopped parsley, pickled onions, jalapeño slices, or crumbled feta if desired.
Tony’s Arayes
Equipment
Ingredients
For the Meat Filling
For the Pitas
For Tony’s Garlic Butter
Optional Dipping Sauce
Instructions
Notes
Frequently Asked Questions
Can You Make Arayes Ahead of Time?
You can stuff arayes up to 24 hours ahead and refrigerate them uncooked. Place the stuffed pitas in a single layer on a baking sheet. Cover tightly with plastic wrap. When ready to cook, brush with oil and grill as directed. They may need an extra minute per side since they’re cold.
Don’t cook arayes ahead and reheat. They lose their crispy texture. The pita becomes soft and chewy. For best results, stuff ahead but cook right before serving.
You can freeze stuffed uncooked arayes for up to 3 months. Wrap each one individually in plastic wrap, then place in freezer bags. Thaw overnight in refrigerator before cooking. Or cook from frozen, adding 2 to 3 extra minutes per side.
What Type of Pita Works Best?
Pocket-style pitas work best for stuffed pita pockets because they create a natural pouch for the filling. These pitas have an air pocket inside that separates during baking. You can easily open them and stuff with meat.
Regular flat pitas without pockets don’t work as well. You’d have to fold them around the filling, which creates uneven thickness. The filling can fall out during grilling.
Fresh pitas from a Middle Eastern bakery or grocery store work better than packaged supermarket pitas. Fresh pitas are softer and less likely to tear when you open them. They also crisp up better on the grill.
Whole wheat pitas work fine and add nutty flavor. They’re sturdier than white pitas and handle the filling well. The flavor is slightly different but still delicious.
Can You Use Ground Turkey or Chicken?
You can use ground turkey or chicken in arayes but the results will be drier than beef. Poultry has less fat. Add 3 tablespoons olive oil to the filling to compensate for missing beef fat. Use dark meat turkey or chicken (85/15) rather than lean breast meat.
Season poultry more heavily than beef. It has milder flavor that needs extra spices. Increase Tony’s to 1½ tablespoons. Add ½ teaspoon extra cumin and paprika.
Cook poultry arayes to 165°F internal temperature instead of 160°F for beef. Use an instant-read thermometer to check. The cooking time will be similar, about 3 to 4 minutes per side.
Ground lamb is the traditional Middle Eastern choice and works excellently. It creates richer, more authentic flavor than beef or poultry. Use 80/20 or fattier lamb.
How Do You Know When Arayes Are Done?
Arayes are done when the pita is golden brown and crispy, and the meat reaches 160°F internal temperature. Insert an instant-read thermometer through the pita into the meat filling. Check the thickest part.
Visual cues include golden brown color on both sides with darker brown spots (or grill marks). The pita should feel crisp when you press it gently. If it feels soft, cook another minute per side.
The edges of the pita will start to darken before the center. This is normal. Don’t wait for uniform color or the center will burn. As long as you see golden brown throughout, they’re ready.
Undercooked arayes have raw pink meat inside and soft, pale pita. Overcooked arayes have burnt, hard pita with dry meat. The 6 to 8 minute total cooking time usually produces perfect results.
Can You Make Arayes Without Meat?
You can make vegetarian arayes with various non-meat fillings. Crumbled feta mixed with spinach, herbs, and spices works well. Spiced lentils create protein-rich vegetarian version. Sautéed mushrooms with onions and cheese create umami-rich filling.
For vegan arayes, use plant-based ground meat alternatives. Season the same way as beef. Add extra oil since most plant-based meats are very lean. Vegan cheese adds richness.
Cooked fillings work better for vegetarian versions since vegetables release water. Sauté any vegetables first to remove excess moisture. Raw vegetables will make the pita soggy.
The cooking method stays the same. Brush with oil and grill until crispy. Vegetarian fillings don’t need to reach specific internal temperature, so cook until the pita is golden and crispy.
What Dipping Sauces Go Best With Arayes?
Traditional Middle Eastern sauces for arayes include tahini sauce, tzatziki, or garlic toum. These cool, creamy sauces balance the hot, spicy meat. Tahini sauce made from sesame paste, lemon juice, and garlic provides nutty richness.
The Tony’s Cajun garlic sauce in this recipe creates fusion flavor that matches the Cajun-spiced filling. The combination of mayo, sour cream, Tony’s, and hot sauce complements the arayes perfectly.
Hot honey BBQ sauce works if you want sweet-spicy balance. Mix ½ cup BBQ sauce with 1 tablespoon hot honey and ½ teaspoon Tony’s. Ranch dressing mixed with Tony’s and lime juice creates familiar American flavor.
Hummus serves as both dip and spread. The chickpea base pairs naturally with Middle Eastern pitas. Spicy harissa hummus adds extra heat.
You can also serve arayes without sauce. The garlic butter finish provides enough moisture and flavor. The meat filling is well-seasoned on its own.
How Do You Prevent Pitas from Burning?
Prevent pita pockets from burning by using medium heat (350°F to 375°F) instead of high heat. High heat burns the thin bread before the meat cooks. Medium heat crisps the exterior while cooking the filling through.
Brush the pitas with enough oil or butter. Dry spots burn faster than oiled areas. The fat creates a protective barrier that promotes even browning rather than charring.
Don’t walk away during cooking. Watch the arayes closely and flip as soon as the first side turns golden brown. Waiting too long causes burning. The thin pita goes from golden to burnt quickly.
Move arayes to cooler spots on the grill if they’re browning too fast. Create a two-zone fire with hot and cool areas. Finish cooking on the cooler side if needed.
If using a flat top or skillet, reduce heat slightly if you notice burning. Better to cook a minute longer at lower heat than burn the bread at high heat.
Can You Make Mini Arayes for Appetizers?
You can make mini arayes using small pita bread or cutting regular pitas into quarters. Mini pitas (about 4 inches diameter) work perfectly. Stuff them the same way as regular size. They cook faster – about 2 to 3 minutes per side.
Cut regular pitas into quarters before stuffing to create triangular mini arayes. Open each quarter carefully and stuff with a thin layer of filling. These work great as party appetizers.
Mini arayes are easier to eat as finger food. Cut them into even smaller triangles after cooking. Arrange on a platter with toothpicks and dipping sauce.
Cooking time decreases significantly for mini versions. Watch them closely. They can burn quickly because of their small size. Flip when you see golden color developing.
What Toppings Can You Add to Arayes?
Traditional toppings for arayes include chopped parsley, diced tomatoes, pickled turnips, and sumac. These fresh elements add color, crunch, and acidity that cut through the rich meat.
Pickled vegetables like onions, jalapeños, or cucumbers add tangy bite. The acid balances the fatty meat. Make quick pickles by soaking sliced onions in lemon juice and salt for 15 minutes.
Crumbled feta cheese adds salty, creamy element. Sprinkle over hot arayes so it softens slightly. The contrast between crispy pita and creamy cheese is excellent.
Fresh herbs like cilantro, mint, or additional parsley brighten the dish. Chop them fine and sprinkle over the finished arayes. They add fresh flavor and visual appeal.
Pomegranate seeds add sweet-tart pop and beautiful color. This is more authentic to Middle Eastern cuisine. The jewel-like seeds look impressive on serving platters.
Can You Reheat Leftover Arayes?
Reheat arayes in a skillet or on a grill for 2 to 3 minutes per side over medium heat. This restores some of the crispy texture. The pita won’t be quite as crispy as fresh but will be much better than microwave reheating.
Air fryer works excellently for reheating at 375°F for 3 to 4 minutes. The circulating air re-crisps the pita nicely. No need to flip in the air fryer.
Oven reheating at 400°F on a baking sheet works for larger quantities. Heat for 8 to 10 minutes until hot throughout. The texture will be drier than skillet or air fryer methods.
Never microwave arayes. The pita becomes tough and rubbery. The texture is completely wrong. Even cold leftover arayes taste better than microwaved ones.
For best results, store leftover arayes wrapped tightly in foil. This keeps them from drying out in the refrigerator. They keep for 3 days refrigerated.
If you’re looking for more recipes like this recipe, click the link! Check out all of our grilling recipes here for more steak, seafood, and BBQ favorites that are perfect for your next cookout.
COMMON ITEMS USED IN THESE RECIPES
Hasty Bake Charcoal Grill and Smoker
Knitted Gloves
Food Processor
Cast Iron Skillet
Meater +
Upgrade Your Meat Game with Grill Nation x Linz Heritage Angus
If you really want to take your grilling and cooking to the next level, you need to check out our collaboration with Linz Heritage Angus. We’ve partnered with them to bring you some of the best beef you can get your hands on.
Linz Heritage Angus isn’t your typical grocery store meat. These guys are the real deal – they raise their cattle the right way, and you can taste the difference in every bite. We’re talking about beef that’s been dry-aged to perfection, with marbling that makes your mouth water just looking at it.
Check out these premium cuts that’ll change how you think about beef:
Premium Ribeye Steaks – Perfect for special occasions
Dry-Aged Beef Selection – Take your grilling to the next level
Ground Beef & Burger Blends – The foundation of great BBQ