

Crispy chicken tenders with bang bang sauce are chicken breast strips double-dipped in a cornstarch and flour breading seasoned with Tony Chachere’s Creole seasoning, then fried at 350°F until golden brown. The tenders marinate briefly in buttermilk mixed with hot sauce before breading. This tenderizes the chicken and helps the coating stick. You fry them for 3 to 4 minutes per side until they reach 165°F internally. The bang bang sauce combines mayonnaise, sweet chili sauce, Sriracha, and honey with a Cajun twist from additional Tony’s seasoning.
The breading uses equal parts flour and cornstarch for maximum crispiness. Cornstarch creates a lighter, crunchier crust compared to all-flour breading. The double-dipping technique coats the chicken twice. This builds a thick, craggy layer that fries up extra crispy. Tony Chachere’s seasoning appears in three places: the buttermilk marinade, the breading, and the bang bang sauce. This creates consistent Cajun flavor throughout.
These Tony’s chicken tenders come together in 25 to 30 minutes from start to finish. The buttermilk marinade needs just 10 minutes. Frying takes about 15 minutes in batches. The bang bang sauce requires simple whisking with no cooking. The result is restaurant-quality crispy tenders with sweet, spicy, tangy sauce that rivals any chain restaurant version.
Why Cornstarch Creates Crispier Coating Than Flour Alone
Cornstarch produces crispier fried chicken coating than all-purpose flour because it contains pure starch without the proteins and fats found in wheat flour. When you fry food coated in cornstarch, it absorbs less oil than flour-based batters. Less oil absorption means lighter, less greasy texture. The coating stays crisp longer after frying because it contains less saturated fat.
The molecular structure of cornstarch creates more delicate, shattering crust. Flour contains gluten proteins that form chewy networks when hydrated and heated. Cornstarch lacks these proteins. It forms a crust that’s brittle rather than tough. When you bite into cornstarch-coated chicken, the coating shatters cleanly. Flour-only coatings can be chewy or dense by comparison.
Cornstarch gelatinizes at higher temperatures than flour proteins set. This means the cornstarch coating stays dry on the surface longer during frying. It has more time to dehydrate and crisp before the interior cooks through. Flour coatings can form a seal earlier. This traps moisture underneath and creates softer texture.
The 50/50 ratio of flour to cornstarch in this recipe provides the best of both. Flour contributes structure and helps the coating adhere to the chicken. It also adds slight nutty flavor. Cornstarch provides the crispy, light texture. Together they create coating that’s both substantial and crispy.
Using only cornstarch would be too delicate. The coating might shatter and fall off the chicken too easily. Using only flour would be too heavy and potentially chewy. The combination creates coating with enough structure to stay attached while maintaining that signature crunch.
How Buttermilk Tenderizes Chicken in Just 10 Minutes
Buttermilk tenderizes chicken quickly because its acidity and enzymes break down protein structures on the meat’s surface. The lactic acid in buttermilk has a pH around 4.5, which is acidic enough to denature proteins. When proteins denature, they unwind and relax. This makes the chicken more tender.
Even a short 10-minute soak produces noticeable results. The acid works on the outer layers of the chicken immediately upon contact. While extended marinating (4 to 24 hours) penetrates deeper, the surface tenderizing from 10 minutes still improves texture. This quick soak is enough to make a difference without requiring advance planning.
Buttermilk also contains calcium and enzymes that further enhance tenderization. The calcium in dairy helps activate enzymes naturally present in the chicken. These enzymes accelerate protein breakdown. The buttermilk provides ideal conditions for this enzymatic action.
The thick consistency of buttermilk helps it cling to chicken better than thin marinades. This creates more surface contact. More contact means more tenderizing effect. Buttermilk also adds mild tangy flavor that complements the Cajun seasonings without competing with them.
Adding hot sauce to the buttermilk marinade serves dual purposes. The vinegar in hot sauce adds more acid for tenderizing. The capsaicin compounds flavor the chicken with subtle heat. Together, buttermilk and hot sauce create a marinade that both tenderizes and seasons.
Why Double-Dipping Creates Thicker, Crunchier Crust
Double-dipping chicken tenders in the breading creates a thicker, more textured coating compared to single dipping. The first dredge in the flour-cornstarch mixture creates a base layer. When you dip the coated chicken back into buttermilk, the wet coating picks up additional flour mixture on the second dredge. This builds a craggy, substantial crust.
The buttermilk between the two breading layers acts as glue. It helps the second layer adhere firmly to the first. Without this wet layer in between, a second coating of dry flour would just brush off. The moisture allows the two layers to bond together into one thick crust.
The double-dip method also creates more surface irregularities and texture. These nooks and crannies in the coating fry up extra crispy. They provide more surface area for oil contact. More surface area means more places for moisture to escape and crispness to develop. Single-dipped tenders have smoother, less interesting texture.
Letting the double-dipped tenders rest for 5 minutes before frying allows the coating to set. During this rest, the moisture from the buttermilk hydrates the flour slightly. The proteins and starches in the breading begin to bind. This creates a more cohesive coating that won’t slough off during frying.
The rest period also lets the coating dry slightly on the surface. A drier surface means the coating will crisp faster when it hits the hot oil. If you fry immediately after breading, excess moisture can cause the oil to splatter. It also takes longer for wet coating to crisp up. The 5-minute rest is worth the wait.
Some cooks add a tablespoon of buttermilk to the dry flour mixture and work it in with their fingers. This creates small clumps in the breading. These clumps stick to the chicken during the second dredge. They create even more texture and crunch when fried. This technique is optional but creates those extra-craggy bits you see on the best fried chicken.
What Makes Tony Chachere’s Essential for Bang Bang Sauce
Tony Chachere’s Original Creole Seasoning transforms standard bang bang sauce from a generic sweet-spicy sauce into something with distinctive Cajun character. The seasoning blend contains salt, red and black pepper, garlic, and Louisiana spices. This complexity adds savory depth that plain bang bang sauce lacks.
Traditional bang bang sauce uses just mayonnaise, sweet chili sauce, and Sriracha. This creates one-dimensional sweet-heat flavor. Adding Tony’s introduces umami, garlic notes, and black pepper bite. The sauce becomes more balanced with savory elements to cut through the sweetness.
Using Tony’s in the sauce creates flavor cohesion when it’s also in the chicken marinade and breading. The Creole seasoning ties all the components together. Every bite of chicken and sauce tastes harmonious rather than like separate elements. This integration makes the dish feel more thoughtful and restaurant-quality.
You only need ½ teaspoon of Tony’s in the sauce. This provides seasoning without making the sauce taste overtly Cajun. The goal is adding complexity and depth, not turning bang bang sauce into remoulade. The amount is subtle enough that someone might not identify Creole seasoning but would notice the sauce tastes better.
Generic Creole or Cajun seasonings can substitute but Tony’s specific blend has the right balance. Some Creole seasonings are too heavily salted. Others emphasize different spices that don’t work as well in sweet-spicy context. Tony’s has become standard for a reason. The formula works.
Lime juice or rice vinegar in the bang bang sauce adds brightness that balances the heavy mayonnaise base. The acid cuts through fat and makes the sauce more refreshing. It also enhances the Sriracha’s vinegar notes. Just 1 teaspoon makes noticeable difference without making the sauce taste citrusy or vinegary.
Crispy Chicken Tenders
With Cajun-Spiced Bang Bang Sauce
Ingredients
For the Chicken
Breading
For Frying
Bang Bang Sauce
Optional Garnish
The cornstarch in the breading is non-negotiable for restaurant-quality crunch. Cornstarch creates lighter, crispier coating than flour alone because it absorbs less oil and forms a more delicate crust. The 50/50 flour-to-cornstarch ratio gives you the perfect balance of structure and crispiness.
Step-by-Step Instructions
Step 1: Marinate the Chicken in Buttermilk
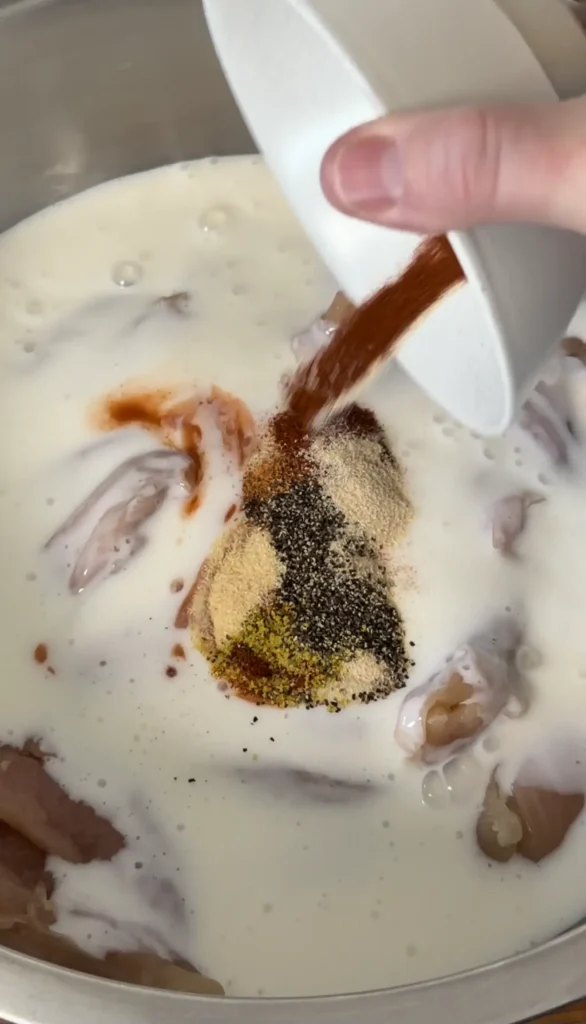
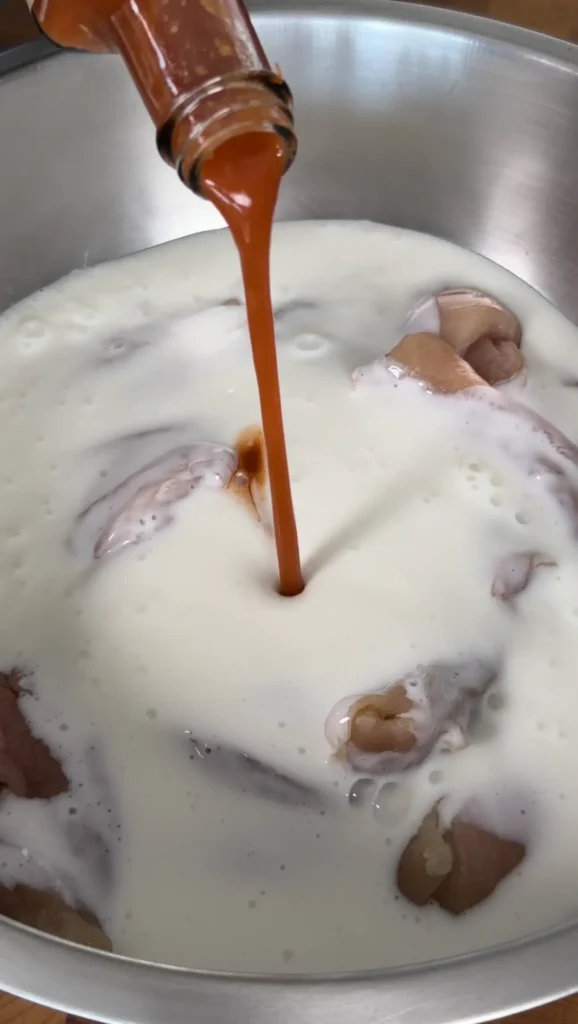
In a large bowl, whisk together 1 cup buttermilk, 1 teaspoon hot sauce, and 1 teaspoon Tony Chachere’s Creole Seasoning. If you don’t have buttermilk, combine 1 cup milk with 1 tablespoon white vinegar. Let it sit for 5 minutes to curdle before adding the other ingredients.
Add 2 pounds of chicken tenders to the buttermilk mixture. Toss to coat every piece completely. The buttermilk should cover all the chicken. If it doesn’t, add a bit more buttermilk or transfer to a smaller bowl where the marinade pools around the chicken.
Let the chicken marinate at room temperature for 10 minutes while you prepare the breading station. This short marination is enough to tenderize the surface and help the coating adhere. Don’t marinate longer than 30 minutes at room temperature for food safety. If marinating longer, refrigerate it.
Step 2: Mix the Crispy Breading
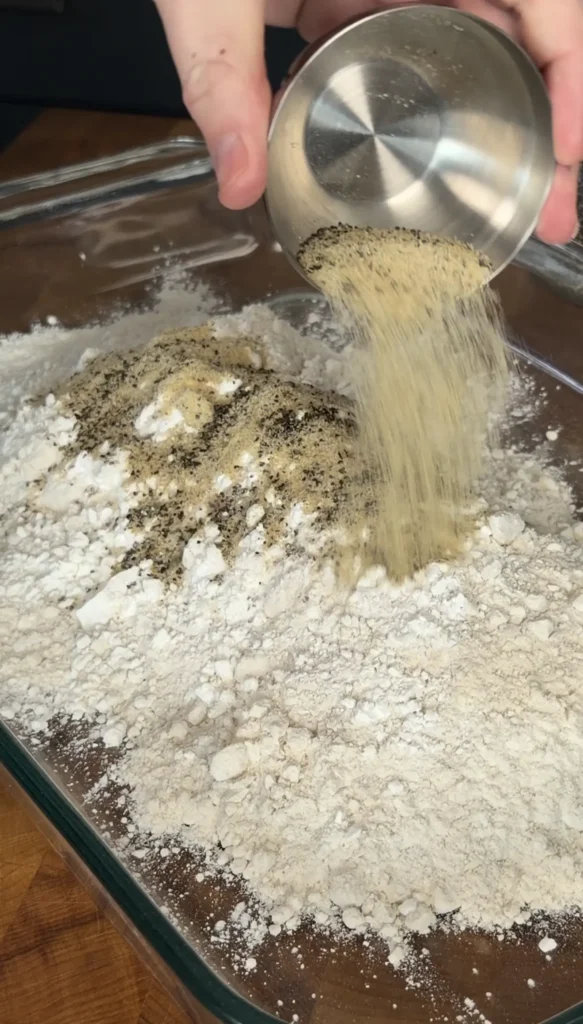
In a shallow dish or pie plate, whisk together 1 cup all-purpose flour and 1 cup cornstarch. The cornstarch is critical for achieving maximum crispiness. Don’t skip it or substitute additional flour.
Add 2 teaspoons Tony Chachere’s Creole Seasoning, 1 teaspoon garlic powder, 1 teaspoon onion powder, 1 teaspoon smoked paprika, ½ teaspoon black pepper, and ½ teaspoon cayenne if using. Whisk thoroughly to distribute all seasonings evenly throughout the flour mixture.
The breading should look evenly colored with no clumps of seasoning. Taste a tiny pinch to check seasoning level. It should taste well-seasoned but not overwhelmingly salty. If it tastes bland, add another teaspoon of Tony’s.
Step 3: Double-Dip the Chicken Tenders
Set up your breading station with the buttermilk marinade bowl and the seasoned flour mixture. Have a wire rack set over a baking sheet nearby for the breaded tenders.
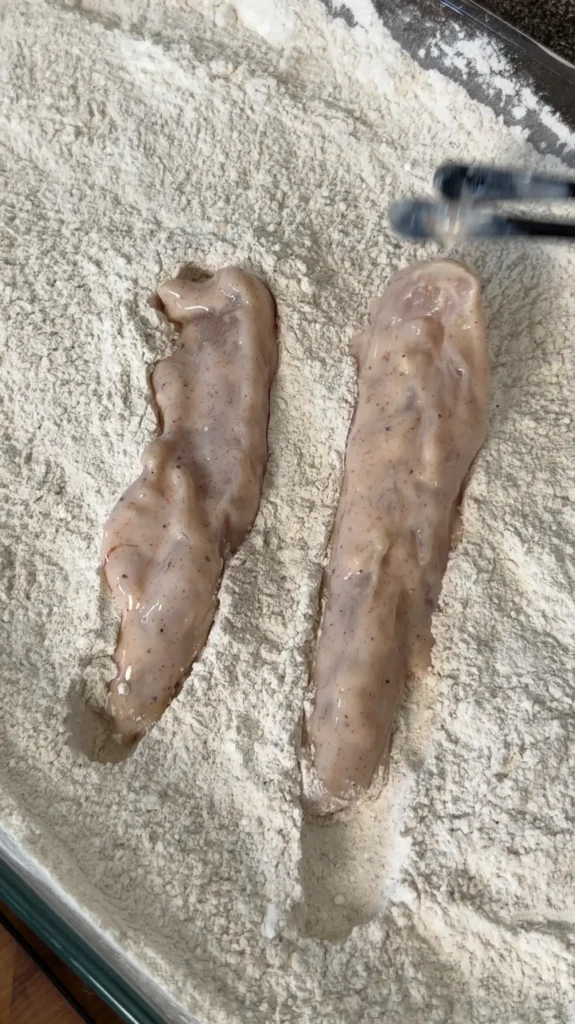
Pull one chicken tender from the buttermilk. Let excess drip back into the bowl but don’t shake it completely dry. You want some moisture clinging to the chicken. Place it in the flour mixture and press down firmly. Flip it and press again. Make sure it’s completely coated with a visible layer of breading.
Lift the tender and dip it back into the buttermilk. This second dip will look messy. The dry coating gets wet again. Immediately return it to the flour mixture. Press firmly again, packing the breading onto the chicken. The second coat should look thick and craggy with lots of texture.
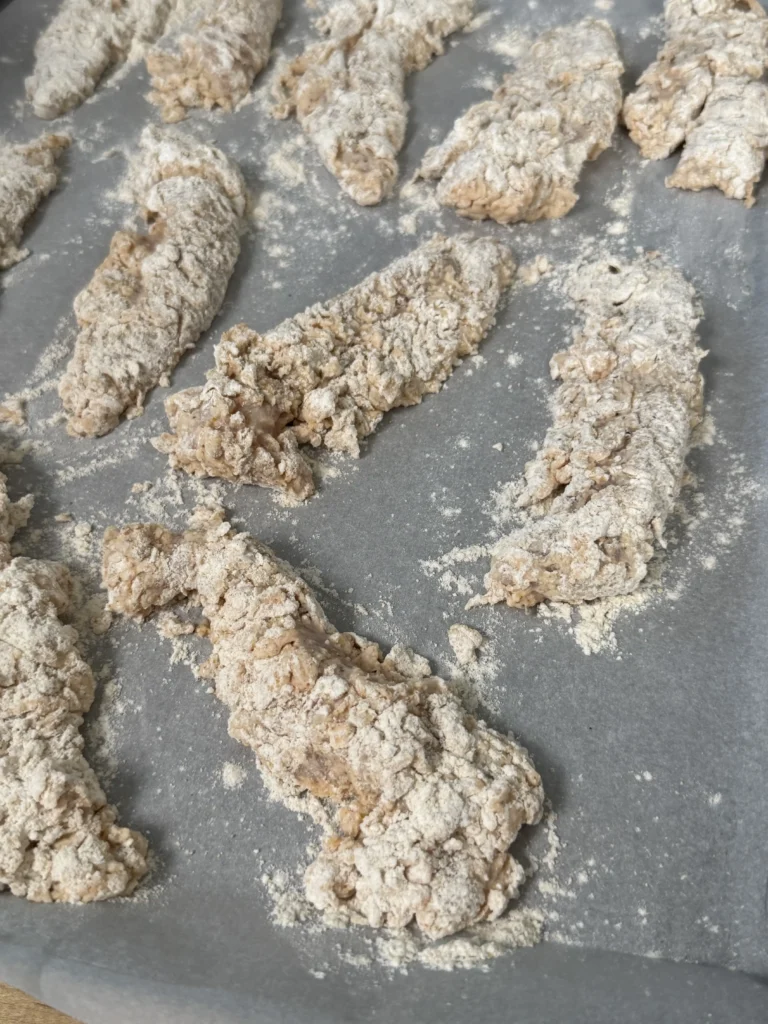
Transfer the double-dipped tender to the wire rack. Repeat with remaining chicken. Work methodically to coat all pieces. Don’t skip any or do single-dipping on some. Consistency ensures even cooking.
Let the breaded tenders rest on the rack for 5 minutes before frying. This allows the coating to set and dry slightly. You’ll see the wet spots disappear and the coating look more matte. This rest period dramatically improves how well the coating adheres during frying.
Step 4: Heat Oil and Fry the Tenders
Pour peanut oil or vegetable oil into a heavy-bottomed pot or Dutch oven to a depth of 1½ to 2 inches. You need enough oil that the tenders can float and flip easily. Clip a deep-fry thermometer to the side of the pot with the tip submerged in oil but not touching the bottom.
Heat the oil over medium-high heat to 360°F to 365°F. This takes 10 to 15 minutes depending on your stove and oil quantity. Watch the thermometer and adjust heat as needed. Don’t rush this preheating step.
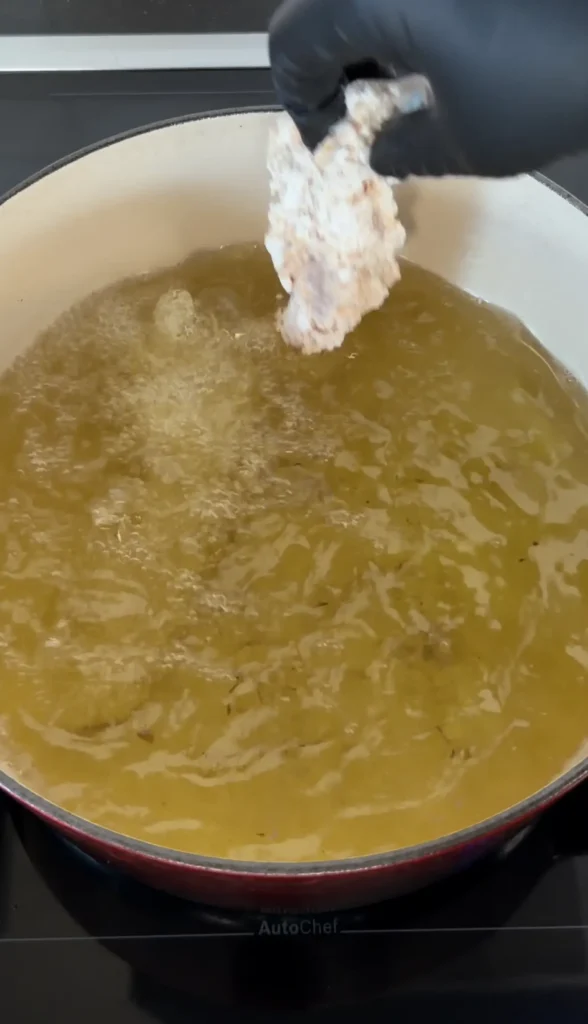
Carefully add 3 to 4 chicken tenders to the hot oil using tongs. Don’t drop them from a height or oil will splatter. Lower them gently into the oil. The temperature will drop immediately to 340°F to 350°F. This is expected and correct.
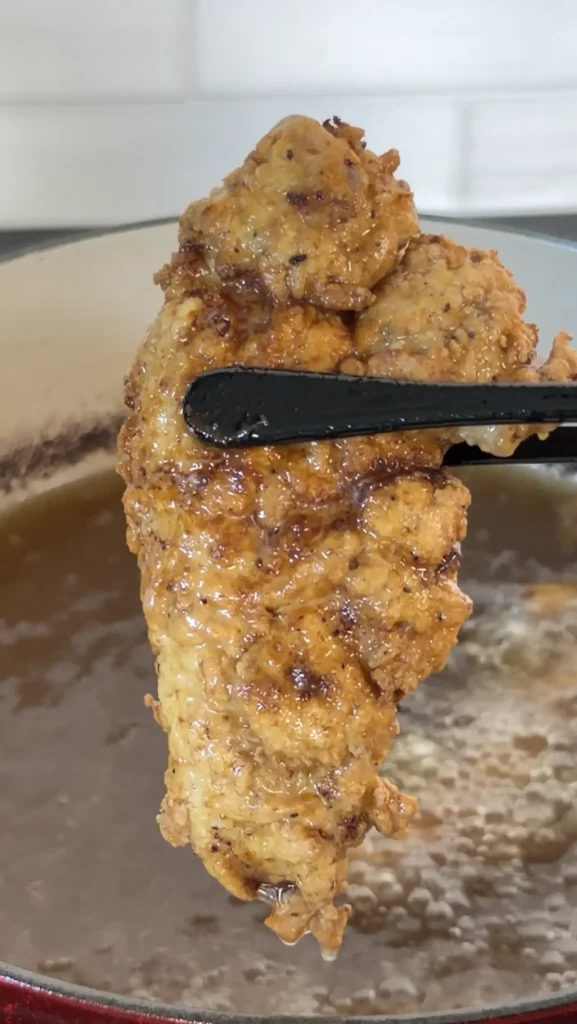
Fry the tenders for 3 to 4 minutes without moving them. The bottoms should be deep golden brown. Use tongs to flip each tender. Fry the second side for another 3 to 4 minutes until golden brown and the internal temperature reaches 165°F.
The total frying time per batch is 6 to 8 minutes depending on thickness. Thicker tenders need closer to 8 minutes. Regular tenders cook in 6 to 7 minutes. Always verify with an instant-read thermometer inserted into the thickest part.
Remove the fried tenders from oil using tongs. Let excess oil drip back into the pot. Transfer them to a clean wire rack set over a baking sheet. Don’t use paper towels. Paper towels trap steam underneath and make the bottom of the coating soggy. The wire rack allows air circulation that keeps all sides crispy.
Let the oil return to 360°F before adding the next batch. Repeat the frying process until all tenders are cooked. The first batch will stay crispy on the rack while you fry the rest.
Step 5: Make the Bang Bang Sauce
While the chicken fries (or before you start cooking), make the bang bang sauce in a medium bowl. Whisk together ½ cup mayonnaise, ¼ cup sweet chili sauce, 1 to 2 tablespoons Sriracha, 1 tablespoon honey if using, ½ teaspoon Tony Chachere’s, and 1 teaspoon lime juice or rice vinegar.
Whisk until completely smooth with no lumps of mayo visible. The sauce should be thick and creamy but pourable. If it seems too thick, add another teaspoon of lime juice. If too thin, add more mayo.
![]()
Taste and adjust seasoning. Add more Sriracha for heat, more sweet chili sauce for sweetness, or more Tony’s for savory depth. The sauce should taste balanced with sweet, spicy, tangy, and savory notes all present.
Set the sauce aside at room temperature if serving within 30 minutes. Otherwise refrigerate it. Bring it back to room temperature before serving or it will be too thick to drizzle.
Step 6: Serve the Crispy Chicken Tenders
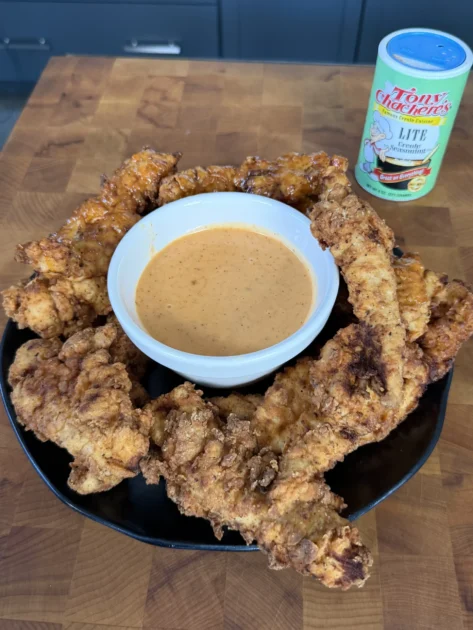
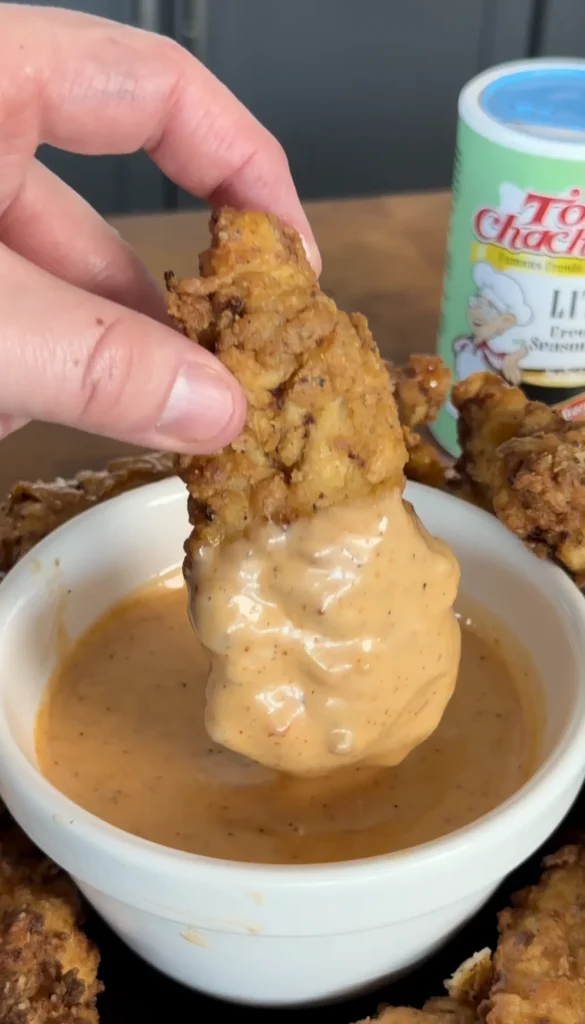
Arrange the fried crispy chicken tenders with bang bang sauce on a serving platter. Drizzle about half the bang bang sauce over the tenders in thin streams. This gives you those appealing drizzle patterns for presentation.
Serve the remaining sauce in a small bowl alongside the tenders for dipping. Some people prefer more sauce than others. Offering both drizzled and dipping options accommodates everyone.
Garnish the platter with sliced green onions and toasted sesame seeds if using. These add color and visual interest. The green onions provide fresh flavor. The sesame seeds add nutty taste and Asian-fusion appeal.
Serve immediately while the tenders are hot and the coating is at maximum crispiness. These are best eaten within 15 minutes of frying. After that, steam from the hot chicken softens the coating slightly. They’re still good but not as spectacularly crispy.

Crispy Chicken Tenders with Bang Bang Sauce
Equipment
Ingredients
For the Chicken
For the Breading
For Frying
For the Bang Bang Sauce
Optional Garnish
Instructions
Notes
Frequently Asked Questions
Can You Bake Chicken Tenders Instead of Frying?
You can bake crispy chicken tenders at 425°F for 18 to 22 minutes but they won’t achieve the same crispiness as fried versions. Place breaded tenders on wire rack over baking sheet. Spray generously with cooking oil spray before baking. Flip halfway through and spray again.
The cornstarch breading helps baked tenders get crispier than regular flour coating. But baking can’t replicate the intense heat and oil contact from frying. Baked tenders will be less crunchy with softer coating.
For best baked results, use panko breadcrumbs mixed with the cornstarch and flour. The larger panko crumbs create more texture. Increase oven temperature to 450°F and bake on the lowest oven rack where heat is most intense.
What Oil Is Best for Frying Chicken Tenders?
Peanut oil is best for frying chicken tenders because it has high smoke point (450°F) and neutral flavor. It won’t break down at frying temperature or add unwanted taste. Refined peanut oil is safe for most people with peanut allergies since protein allergens are removed during processing.
Vegetable oil works as affordable alternative with 400°F to 450°F smoke point. Canola oil also works well. Both have neutral flavors that let the seasoned chicken and sauce shine through.
Avoid olive oil which has low smoke point (350°F to 410°F depending on grade). It can smoke excessively and add bitter flavor. Avoid butter which burns at frying temperatures.
Use fresh oil rather than reused oil for best flavor. Reused oil can carry flavors from previous cooking and may have degraded from repeated heating.
Can You Make Bang Bang Sauce Spicier?
You can make bang bang sauce significantly spicier by increasing Sriracha to 3 to 4 tablespoons. Add extra cayenne pepper (¼ to ½ teaspoon) directly to the sauce. Include diced jalapeños or serrano peppers for fresh heat.
For extreme heat, add hot sauce like Louisiana hot sauce or Tabasco alongside the Sriracha. Mix in ¼ teaspoon ghost pepper powder or habanero powder. Be conservative with super-hot additions and taste as you go.
Balance increased heat with extra honey or sweet chili sauce. Too much heat without sweetness tastes harsh. The sweet elements should always balance the spicy ones for best flavor.
How Do You Know When Chicken Tenders Are Done?
Chicken tenders are done when internal temperature reaches 165°F measured with instant-read thermometer inserted into thickest part. This is the safe minimum temperature recommended by USDA for poultry.
Visual cues include deep golden brown coating and juices running clear when pierced. The meat should look white throughout with no pink remaining. Texture should feel firm when pressed, not soft or squishy.
Cooking time varies by thickness. Standard tenders cook in 6 to 7 minutes total at 350°F. Thicker tenders may need 8 to 9 minutes. Always verify with thermometer rather than relying on time alone.
Undercooked chicken is unsafe to eat. Overcooked chicken becomes dry and tough. The 165°F target ensures safety while maintaining juiciness.
Can You Use Chicken Breasts Instead of Tenders?
You can use chicken breasts instead of tenders for this recipe. Slice boneless, skinless chicken breasts into strips about ¾ inch thick and 3 to 4 inches long. This creates similar size pieces to natural tenders.
Sliced chicken breast cooks in the same time as tenders at 350°F. The key is cutting uniform thickness so all pieces cook evenly. Pound thicker areas if needed to create consistent ¾-inch thickness throughout.
Chicken breast tends to be slightly drier than tenders. The buttermilk marinade becomes even more important for keeping sliced breast moist. Consider marinating for full 30 minutes instead of just 10.
Natural chicken tenders have better texture and stay juicier because they’re from a different part of the breast with slightly different muscle structure. But sliced breast works well when tenders aren’t available.
How Long Does Bang Bang Sauce Last?
Bang bang sauce keeps refrigerated in airtight container for up to 1 week. The mayonnaise base is the limiting factor for shelf life. Fresh-made sauce tastes best within 3 to 4 days.
Bring refrigerated sauce to room temperature before serving or it will be too thick to drizzle. Let it sit out for 15 to 20 minutes or microwave for 10 to 15 seconds.
Don’t freeze bang bang sauce. The mayonnaise separates when frozen and thawed, creating grainy texture that won’t re-emulsify. The sauce is quick enough to make that freezing isn’t necessary.
Make sauce same day as chicken for best flavor and texture. The ingredients don’t benefit from sitting time like some sauces. Fresh-mixed tastes as good as sauce that’s been refrigerated.
Why Is My Breading Falling Off?
Breading falls off chicken tenders when coating doesn’t adhere properly. Common causes include skipping the buttermilk marinade, not pressing the breading firmly, or moving chicken too much during frying.
The buttermilk creates sticky surface that helps breading grip. Without it, dry flour slides off smooth chicken. Make sure chicken is well-coated with buttermilk before first dredge.
Press the breading firmly onto chicken during both dredging steps. Just dipping and lifting creates loose coating. Pack it on with your hands.
Let breaded chicken rest 5 minutes before frying. This allows coating to set and bond. Frying immediately after breading increases chances of coating separating.
Don’t move or flip chicken excessively during frying. Let it cook undisturbed for full 3 to 4 minutes per side. Constant flipping disrupts coating before it fully sets.
Can You Air Fry These Chicken Tenders?
You can air fry crispy chicken tenders at 400°F for 10 to 12 minutes, flipping halfway through. Spray breaded tenders generously with cooking oil before air frying. Spray again after flipping.
Air fried tenders won’t be quite as crispy as deep fried but they’ll be much crispier than baked. The circulating hot air creates good browning. The oil spray helps coating crisp up.
Don’t crowd the air fryer basket. Cook in batches with tenders in single layer. Overlapping prevents proper air circulation and creates uneven cooking.
Increase cooking time by 2 to 3 minutes if tenders are very thick. Check internal temperature reaches 165°F. Air fryer temperatures can vary significantly between brands.
The cornstarch breading works particularly well for air frying. It crisps better than regular flour coating in dry heat environment.
What Sides Go Best With Chicken Tenders?
Chicken tenders with bang bang sauce pair well with French fries, coleslaw, or potato wedges. The crispy, hot sides complement the crunchy tenders. Creamy coleslaw balances the spicy sauce.
Mac and cheese makes indulgent pairing. The rich, cheesy side contrasts with tangy bang bang sauce. Serve cornbread or biscuits for Southern-style meal.
Lighter options include cucumber salad, green salad with ranch dressing, or steamed broccoli. These provide freshness and crunch without adding more fried food.
For Asian fusion approach matching the bang bang sauce, serve with white rice or fried rice. Add edamame or Asian cucumber salad. This creates cohesive flavor profile.
Can You Reheat Fried Chicken Tenders?
You can reheat fried chicken tenders in 400°F oven on wire rack for 8 to 10 minutes. The wire rack allows air circulation that helps restore crispiness. The high heat re-crisps the coating.
Air fryer works excellently for reheating at 375°F for 4 to 5 minutes. The circulating air recreates some of the original fried texture.
Avoid microwave reheating which makes coating soggy and rubbery. Microwave steams food rather than crisping it. The convenience isn’t worth the texture sacrifice.
Stovetop reheating in dry skillet over medium heat works for quick reheat. Cook 2 to 3 minutes per side until hot. This method won’t restore full crispiness but prevents sogginess.
Leftover chicken tenders are best eaten cold rather than poorly reheated. The coating maintains better texture at room temperature than after microwave reheating.
If you’re looking for more recipes like this recipe, click the link! Check out all of our grilling recipes here for more steak, seafood, and BBQ favorites that are perfect for your next cookout.
COMMON ITEMS USED IN THESE RECIPES
Hasty Bake Charcoal Grill and Smoker
Knitted Gloves
Food Processor
Cast Iron Skillet
Meater +
Upgrade Your Meat Game with Grill Nation x Linz Heritage Angus
If you really want to take your grilling and cooking to the next level, you need to check out our collaboration with Linz Heritage Angus. We’ve partnered with them to bring you some of the best beef you can get your hands on.
Linz Heritage Angus isn’t your typical grocery store meat. These guys are the real deal – they raise their cattle the right way, and you can taste the difference in every bite. We’re talking about beef that’s been dry-aged to perfection, with marbling that makes your mouth water just looking at it.
Check out these premium cuts that’ll change how you think about beef:
Premium Ribeye Steaks – Perfect for special occasions
Dry-Aged Beef Selection – Take your grilling to the next level
Ground Beef & Burger Blends – The foundation of great BBQ