

Crispy accordion potatoes are thinly sliced russet potatoes threaded onto skewers and fanned out into an accordion shape, then baked on a wire rack at 425°F until the edges turn shatter-crisp and deep golden brown while the centers stay fluffy and tender. The potatoes get sliced about ⅛ inch thick, soaked in cold water for 30 minutes to remove surface starch, then dried thoroughly before being tossed with oil and seasonings.
The whole process takes about 1 hour and 25 minutes from start to finish, including the critical 30-minute starch-removal soak and 45 minutes of high-heat baking. You slice the potatoes thin, soak them to remove excess starch that would otherwise prevent crisping, dry them completely, coat them in oil, then skewer and fan them before baking. The technique combines starch removal, moisture control, proper spacing, and elevated baking to create texture that rivals deep-fried potatoes without any actual frying. This crispy accordion potato recipe works with simple pantry ingredients and basic kitchen equipment, giving you restaurant-quality results that look impressive but require straightforward techniques.
Why Soaking Potatoes in Water Makes Them Crispier
Soaking sliced potatoes in cold water removes excess surface starch, which is the single most important step for achieving crispy texture in baked accordion potatoes. Russet potatoes contain high levels of starch that gets released when you cut through the cells with a knife. This surface starch creates a barrier that prevents proper crisping during baking because it forms a gummy, paste-like coating when heated with moisture.
When you submerge potato slices in cold water, the starch molecules dissolve and leach out into the water through a process called osmosis. You’ll notice the water turning cloudy or milky after 10 to 15 minutes of soaking, which is visible evidence of starch leaving the potato surface. A 30-minute soak removes enough surface starch to make a significant difference in final texture without soaking so long that you start losing the potato’s natural starches, which contribute to that fluffy interior you want.
The starch removal allows the potato surfaces to dehydrate properly in the oven instead of forming that gummy coating. When excess starch is present, it absorbs moisture and creates a barrier that traps steam against the potato surface. This steam keeps the exterior soft and prevents the Maillard reaction from occurring efficiently. With the starch removed, the potato surfaces can dry out quickly in the hot oven, allowing proteins and sugars to brown and crisp without interference.
You need to drain the potatoes well after soaking and pat them completely dry with paper towels. Any water left on the surfaces will turn to steam in the oven and prevent crisping just like excess starch would. Some cooks skip the drying step and wonder why their potatoes don’t crisp properly even after soaking. The combination of starch removal through soaking plus thorough drying creates the ideal starting conditions for maximum crispiness.
Some recipes suggest rinsing potatoes under running water instead of soaking them, but this doesn’t work as well. Rinsing only removes starch from the outer surfaces that the water directly contacts, while soaking allows starch to leach out from between the slices and from surfaces that wouldn’t get rinsed thoroughly. The 30-minute soak time gives starch molecules enough time to fully dissolve and escape into the water, whereas a quick rinse leaves significant starch behind.
Why Russet Potatoes Work Better Than Other Varieties for Accordion Potatoes
Russet potatoes create the crispiest accordion potatoes because their high starch content and low moisture levels produce the ideal combination of fluffy interiors and crispy exteriors when baked at high heat. The starch composition in russets is fundamentally different from waxy potatoes like red potatoes or Yukon golds, and this difference directly impacts texture.
Russets contain about 18 to 22% starch by weight, with most of that starch being amylose rather than amylopectin. Amylose molecules are long chains that separate from each other when heated, creating a dry, fluffy texture. When you bake russet potato slices, the interiors become light and airy rather than dense or gluey. This fluffy interior provides excellent textural contrast with the crispy edges, which is what makes accordion potatoes so appealing.
The low moisture content in russets is equally important. Russets typically contain 63 to 65% water compared to 70 to 75% in waxy varieties. This difference might seem small, but it has major implications for crisping. Less moisture means less steam to escape during cooking, which allows the surfaces to dehydrate faster and brown more efficiently. Waxy potatoes have so much moisture that they tend to steam themselves even when you’re trying to roast or bake them, resulting in soft exteriors that never develop proper crispiness.
The thick skin on russet potatoes also contributes to better structure. When you slice russets thin and fan them on skewers, they hold their shape well during the long baking time without falling apart or becoming mushy. Waxy potatoes with thinner skins can become fragile when sliced thin and may break or collapse during handling and cooking.
Yukon gold potatoes fall in the middle between russets and waxy reds in terms of starch content and moisture levels. They can work for accordion potatoes if russets aren’t available, but they won’t get quite as crispy and the interiors won’t be as fluffy. The results are acceptable but noticeably different from russets. Red potatoes, fingerlings, and other waxy varieties simply don’t work well for this application because they lack the starch needed for fluffy interiors and contain too much moisture to crisp properly.
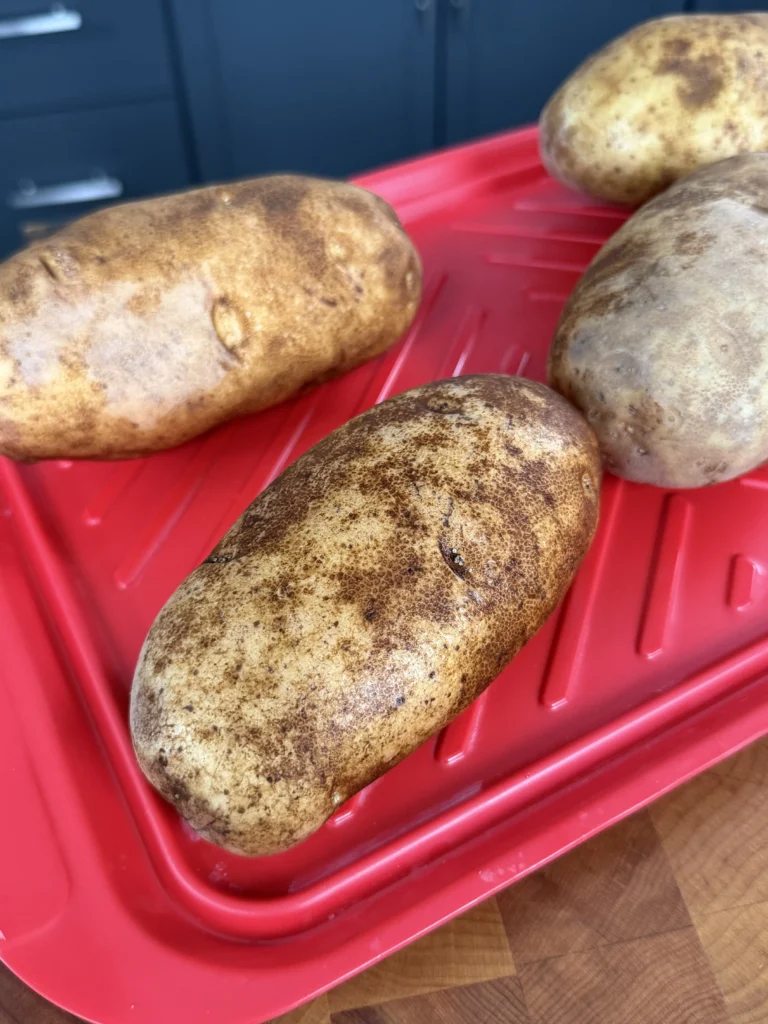
You want to select russet potatoes that are large, uniform in size, and free from green spots or sprouting. Larger potatoes give you more surface area per potato, which means more crispy edges once you slice and fan them. Avoid russets with green tinges, which indicate solanine development and can taste bitter even after cooking.
Why You Need a Wire Rack for Maximum Crispiness
Elevating crispy accordion potatoes on a wire rack during baking is essential for achieving even browning and crispy texture on all surfaces because it allows hot oven air to circulate completely around each potato including the bottom. When you place potatoes directly on a baking sheet, the bottoms sit against metal that conducts heat differently than air, and any rendered moisture or oil pools underneath the potatoes, creating steam that prevents the bottom surfaces from crisping.
The wire rack solves both of these problems simultaneously. The elevation creates space between the potatoes and the baking sheet below, allowing convective heat to flow freely underneath. Oven air heated by the top and bottom heating elements circulates through the rack openings, exposing the bottom surfaces of the potatoes to the same dry heat environment as the tops and sides. This all-around heat exposure ensures every ridge and edge of your accordion potatoes gets equally crispy.
The rack also allows any oil that drips from the potatoes during cooking to fall through onto the baking sheet below rather than pooling around the potatoes. As potatoes cook, they release some of their internal moisture which mixes with the oil coating and can drip down. If this mixture sits against the potato bottoms, it creates steam pockets that keep those areas soft and pale. The rack lets everything drip away, maintaining the dry environment needed for proper crisping.
You want to use a sturdy metal cooling rack that can withstand 425°F temperatures without warping. Wire racks designed for baking typically have tighter grid patterns than basic cooling racks, which provides better support for smaller food items. Make sure the rack fits inside your rimmed baking sheet with at least ½ inch of clearance on all sides so air can flow around it properly.
How to Get Accordion Potatoes Crispy Without a Deep Fryer
Creating restaurant-quality crispy accordion potatoes without deep frying requires combining multiple techniques that work together to remove moisture, promote browning, and maximize surface exposure to dry heat. The key elements are starch removal, thorough drying, high temperature baking, elevated positioning, proper spacing, and strategic oil application.
Start with starch removal through the 30-minute cold water soak, which eliminates the gummy coating that prevents crisping. Follow this immediately with aggressive drying using paper towels, pressing firmly to absorb as much water as possible from every surface. Some cooks even let the drained potato slices air-dry for an additional 5 to 10 minutes after towel-drying to ensure maximum dryness before oiling.
High oven temperature is non-negotiable for crispy results. You need 425°F to drive off surface moisture quickly and promote rapid browning through the Maillard reaction. Lower temperatures like 350°F or 375°F cook the potatoes through but don’t create enough heat for proper crisping. The high heat creates an environment where water evaporates faster than it can penetrate back into the potato, leaving the surfaces dry enough to brown and crisp.
The oil coating serves multiple purposes beyond just adding fat for flavor. Oil conducts heat more efficiently than air, helping the potato surfaces reach crisping temperatures faster. It also prevents sticking and promotes even browning by filling in microscopic surface irregularities. Use just enough oil to coat the surfaces lightly without drowning them, about 1 tablespoon per large potato. Too much oil can actually prevent crisping by creating a barrier that traps moisture underneath.
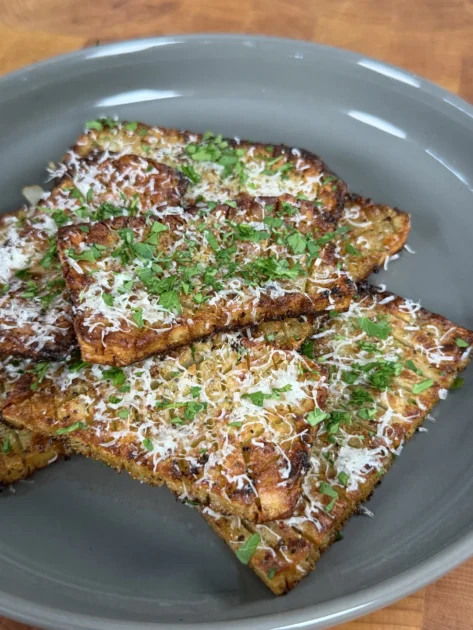
Crispy Accordion Potatoes
Shatter-Crisp Edges, Fluffy Centers & Deep Golden Color
Ingredients
For the Potatoes
For Finishing (Optional)
Equipment Needed
The secret to restaurant-quality crispiness is removing excess starch through soaking, then drying the potatoes completely before baking. This two-step moisture management process allows the potato surfaces to dehydrate in the oven and develop that shatter-crisp texture instead of steaming and staying soft.
Step-by-Step Instructions
Step 1: Prepare and Slice the Potatoes
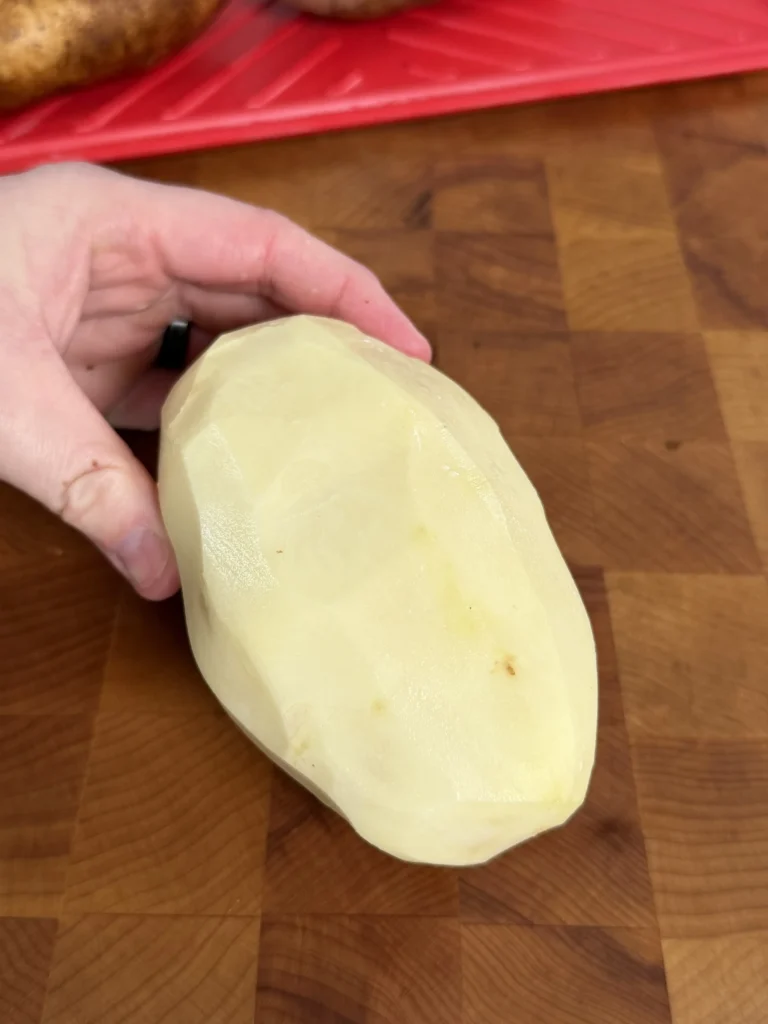
Wash 3 large russet potatoes thoroughly under cold running water, scrubbing with a vegetable brush to remove any dirt or debris. If you’re peeling the potatoes, do this now using a vegetable peeler, working lengthwise from one end to the other. Pat the potatoes dry with paper towels.
Using a sharp knife or mandoline slicer, cut each potato crosswise into ⅛-inch thick slices. A mandoline gives you the most consistent thickness, which helps the potatoes cook evenly and crisp uniformly. If using a knife, take your time and focus on making each slice as uniform as possible. Keep the slices stacked in their original order so they maintain the potato’s natural shape when you skewer them later.
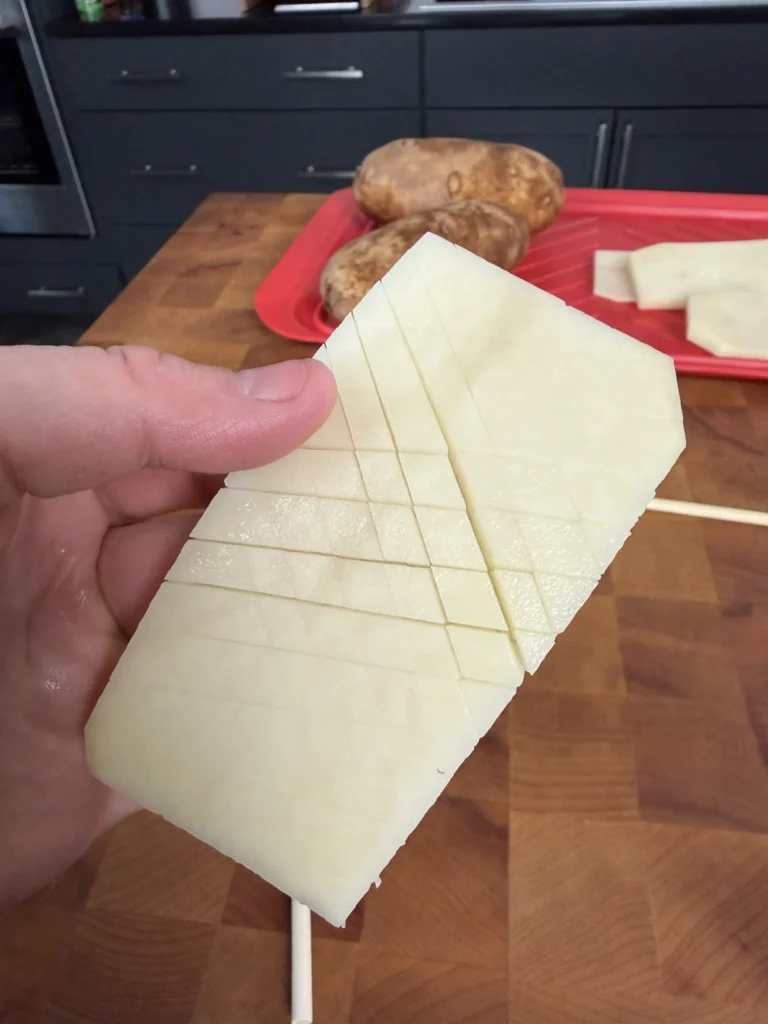
You’re aiming for slices thin enough to fan apart and crisp nicely but thick enough to handle without breaking. Slices much thinner than ⅛ inch become fragile and can tear during the soaking and skewering process. Slices thicker than ⅛ inch won’t crisp as thoroughly and take longer to cook through.
Step 2: Soak to Remove Excess Starch
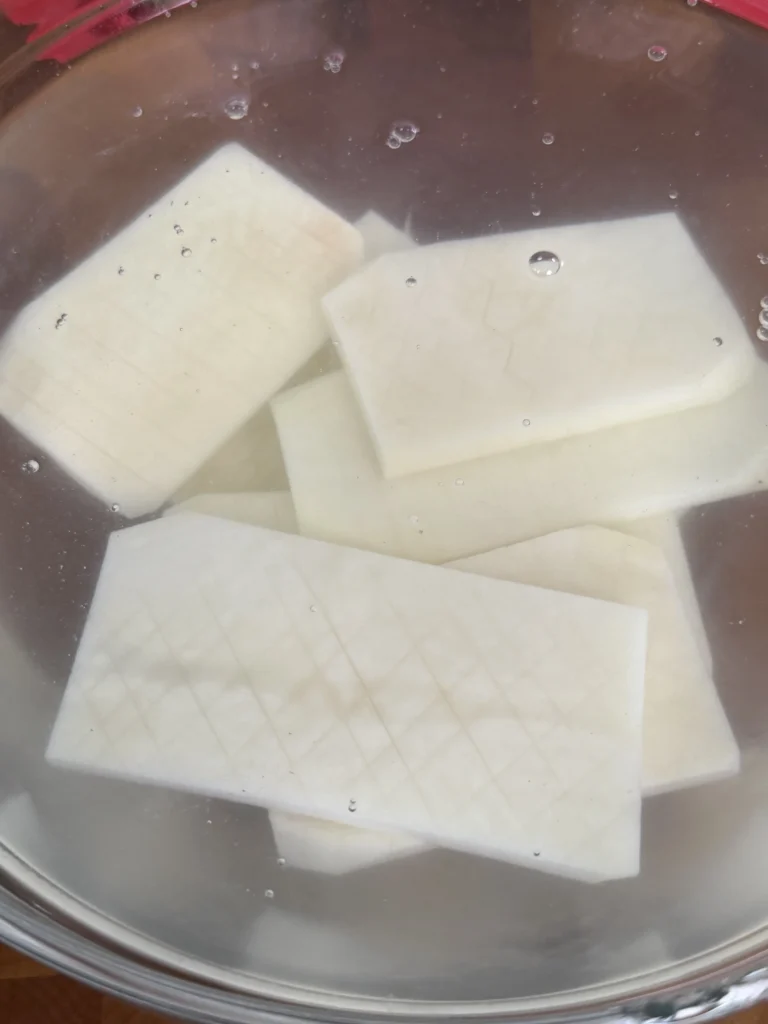
Transfer all the potato slices to a large bowl and cover them completely with cold water. Make sure every slice is submerged so starch can leach out evenly from all surfaces. Let the potatoes soak for 30 minutes at room temperature, which gives enough time for significant starch removal without soaking so long that you start affecting the potato’s internal structure.
You’ll notice the water becoming cloudy or milky as starch dissolves out of the cut potato surfaces. This visible cloudiness confirms the process is working. After 30 minutes, drain the potatoes in a colander and rinse them briefly under cold running water to remove any starch clinging to the surfaces.
This starch removal step is absolutely critical for achieving crispy texture, so don’t skip it or reduce the soaking time. The 30-minute duration has been tested extensively and produces the best balance between starch removal and maintaining potato structure.
Step 3: Dry Thoroughly and Season
Spread the drained potato slices on a clean kitchen towel or several layers of paper towels. Pat them dry aggressively, pressing down firmly to absorb as much water as possible from both sides of each slice. Pay special attention to the spaces between slices if they’re sticking together, separating them gently and patting dry.
Transfer the dried slices to a large clean bowl. If you have time, let them air-dry for an additional 5 minutes to evaporate any remaining surface moisture. Add 3 tablespoons olive oil and 1 teaspoon kosher salt to the bowl. Toss the potato slices gently but thoroughly, making sure the oil coats every surface. The oil creates a moisture barrier and promotes even browning during baking.
Don’t add the pepper, garlic powder, or paprika at this stage. These seasonings can burn during the long baking time, so you’ll add them later. The light salt coating at this point enhances flavor without interfering with crisping.
Step 4: Skewer and Fan the Potatoes
Take two metal skewers or wooden skewers that have been soaked in water for 30 minutes. Thread all the slices from one potato onto the two skewers, running them parallel to each other about 1 inch apart. The skewers should go through the same position on each slice, typically about ⅓ of the way in from one edge, so the potato maintains a consistent shape.
Push the slices together snugly on the skewers, then gently fan them open by pulling the slices apart with your fingers. Create visible space between each slice rather than leaving them touching, which allows hot air to circulate and crisp all the edges. The fanned potato should look like an accordion or fan, with each slice slightly separated from its neighbors.
The two-skewer method is essential because it prevents the potato slices from spinning on a single skewer and keeps everything aligned properly. The spacing between skewers provides stability and makes the fanned structure more rigid and easier to handle. Repeat this process with the remaining two potatoes.
Step 5: Position on Wire Rack and Preheat Oven
Line a large rimmed baking sheet with aluminum foil for easy cleanup. Place a wire cooling rack on top of the foil-lined sheet, making sure there’s clearance around the edges for air circulation. The rack needs to be elevated above the pan surface so air can flow underneath.
Preheat your oven to 425°F with a rack positioned in the center of the oven. This temperature is high enough to promote rapid browning and crisping while still allowing the potato interiors to cook through without burning the edges. Don’t start baking until the oven reaches full temperature, which typically takes 15 to 20 minutes.
Place the three skewered accordion potatoes on the wire rack, spacing them apart so they’re not touching each other. Good spacing ensures hot air can circulate around each potato freely. If your potatoes are quite large and don’t all fit on one rack with proper spacing, use two baking sheets with racks rather than crowding them.
Step 6: Bake and Flip for Even Crisping
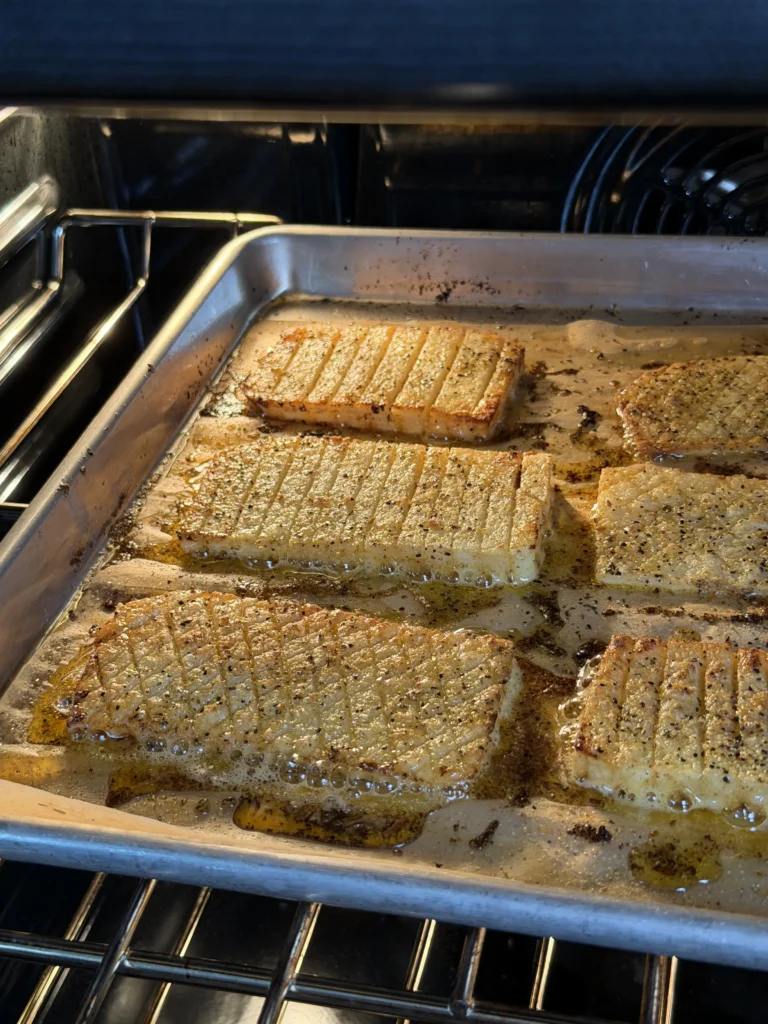
Place the baking sheet in the preheated 425°F oven and bake for 25 minutes without opening the oven door. During this initial baking phase, the potato surfaces begin dehydrating and the outsides start developing color and crispiness. You’ll smell the potatoes roasting and may notice some sizzling sounds as moisture escapes and oil heats up.
After 25 minutes, carefully open the oven and use tongs to flip each skewered potato over, turning them 180 degrees so the bottom becomes the top. Work quickly to minimize heat loss but be gentle to avoid breaking the fragile fanned slices. The potatoes should already show some golden color on the exposed surfaces and feel firmer than when you put them in.
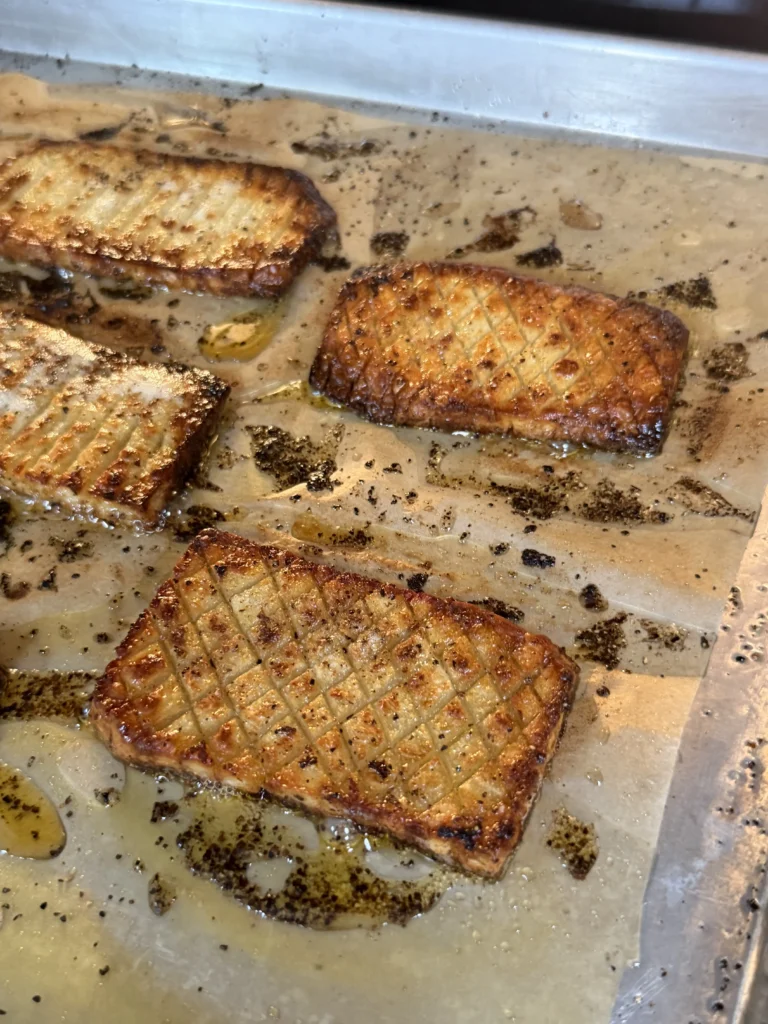
Return the baking sheet to the oven and continue baking for 20 to 25 more minutes until the potatoes are deep golden brown all over with visible crispy edges. The slices should feel firm and dry when you touch them with tongs rather than soft or floppy. Total baking time is 45 to 50 minutes depending on potato size and how thinly you sliced them.
Step 7: Season and Finish Under the Broiler
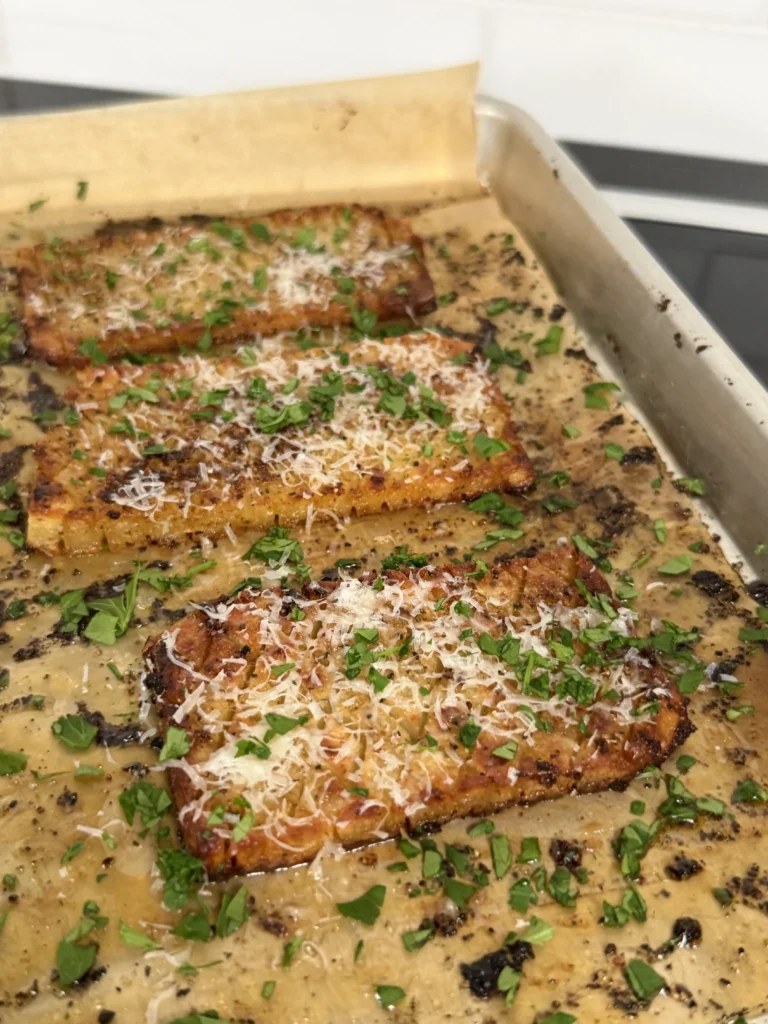
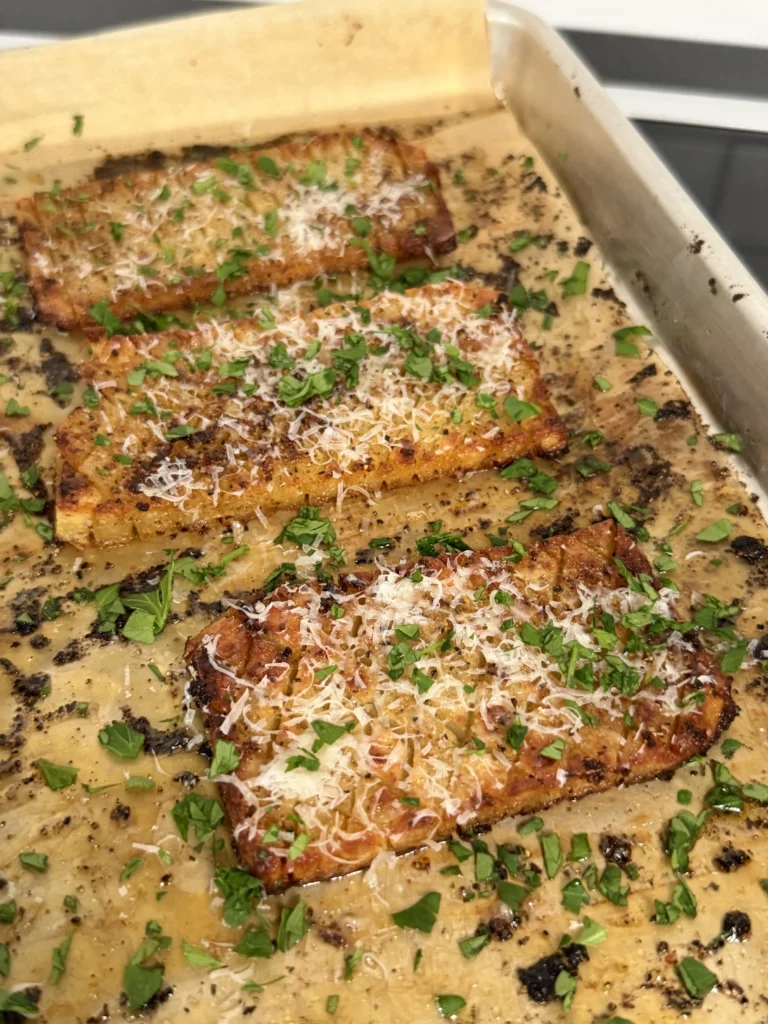
Remove the potatoes from the oven when they’re golden brown and crispy. Brush each accordion potato with melted butter if using, which adds richness and helps seasonings stick. Sprinkle the potatoes with black pepper, garlic powder, paprika, and grated Parmesan cheese, distributing the seasonings evenly over all the exposed surfaces.
Switch your oven to broil on high and position the rack about 6 inches from the heating element. Return the seasoned potatoes to the oven and broil for 2 to 4 minutes, watching constantly through the oven window. The broiler’s intense direct heat caramelizes the cheese, deepens the golden color, and creates blistered spots on the most exposed edges.
Pull the potatoes from the broiler as soon as you see the edges darkening to a deep golden brown with some darker spots appearing. The cheese should be melted and bubbling if you used it. Don’t walk away during this step because the thin potato edges can burn within seconds under the broiler’s intense heat.
Step 8: Rest and Serve
Let the crispy accordion potatoes rest on the wire rack for 3 to 5 minutes before serving. This brief resting period allows the crispy surfaces to set and firm up slightly, making them even crunchier. The potatoes also cool just enough that people won’t burn their mouths on molten-hot oil or cheese.
Carefully slide the potatoes off the skewers using tongs or a fork to hold them steady while you pull the skewers out. Transfer the accordion potatoes to a serving platter and sprinkle with flaky sea salt and fresh chopped parsley or chives if desired. The finishing salt adds a pleasant crunch and bright mineral flavor that enhances the overall taste.
Serve immediately while the potatoes are still hot and at peak crispiness. The texture is best within 15 to 20 minutes of removing them from the oven, though they’ll still taste good for longer. These accordion potatoes make an impressive presentation on the plate alongside grilled steaks, BBQ ribs, or roasted chicken.

Crispy Accordion Potatoes
Equipment
Ingredients
For the Potatoes
For Finishing (Optional)
Instructions
Notes
Frequently Asked Questions
Can You Make Accordion Potatoes in an Air Fryer?
You can make accordion potatoes in an air fryer, and the rapid air circulation creates exceptionally crispy results, though you’ll need to work in smaller batches since most air fryers can only fit 1 to 2 skewered potatoes at a time. The air fryer method produces similar crispiness to oven baking but reduces cooking time by about 10 to 15 minutes due to the concentrated heat and more efficient air circulation.
Prepare the potatoes exactly the same way by soaking, drying, oiling, and skewering them. Preheat your air fryer to 400°F, which is slightly lower than the oven temperature but compensates with faster air movement. Place the skewered accordion potatoes in the air fryer basket, making sure they don’t touch each other or the basket walls. Depending on your air fryer size, you might only fit one potato per batch.
Cook at 400°F for 15 minutes, then carefully flip the potatoes using tongs. Continue cooking for another 12 to 15 minutes until golden brown and crispy all over. Check the potatoes at the 25-minute mark and adjust timing based on how crispy they look. Smaller air fryers with more concentrated heat might finish faster, while larger models might need the full 30 minutes.
After air frying, you can brush the potatoes with melted butter, add seasonings, and run them under your oven broiler for 2 to 3 minutes if you want extra caramelization. Alternatively, some air fryers have broil or crisper settings that work for this final finishing step. The air fryer method is ideal when you’re only making 2 to 4 servings and want slightly faster cooking, though it’s less practical for larger batches where the oven’s capacity advantage becomes important.
What Can You Serve With Crispy Accordion Potatoes?
Crispy accordion potatoes work perfectly alongside rich, hearty proteins like grilled ribeye steak, prime rib, BBQ brisket, or smoked ribs because their crispy texture and mild potato flavor complement bold, savory meats without competing for attention. The potatoes act as a neutral backdrop that soaks up meat juices and provides textural contrast to tender, juicy proteins.
For steakhouse-style meals, serve accordion potatoes with grilled or pan-seared steaks, adding classic accompaniments like creamed spinach, Caesar salad, or roasted asparagus. The combination creates that upscale restaurant experience at home. Finish the potatoes with Parmesan cheese and black pepper to match the steakhouse aesthetic.
BBQ applications work equally well since the crispy potatoes provide welcome contrast to tender smoked meats. Pair them with pulled pork sandwiches, smoked chicken, or BBQ ribs, alongside traditional BBQ sides like coleslaw and baked beans. The potatoes’ neutral flavor balances the sweet and tangy BBQ sauces without clashing.
For more casual meals, accordion potatoes elevate simple burgers, grilled chicken breasts, or pork chops into something more special. They work well at holiday dinners too, replacing traditional roasted potatoes or mashed potatoes with something more visually impressive. The accordion shape makes them look fancier than they actually are to prepare.
Dipping sauces enhance the eating experience. Serve accordion potatoes with garlic aioli, ranch dressing, sour cream mixed with chives, or even ketchup for a casual touch. The crispy ridges catch and hold dips better than regular roasted potatoes, making every bite more flavorful.
How Do You Store and Reheat Leftover Accordion Potatoes?
Store leftover accordion potatoes in an airtight container in the refrigerator for up to 3 days, though you should accept that they’ll never be quite as crispy as when freshly made. Let the potatoes cool completely to room temperature before storing to prevent condensation from forming inside the container, which would make them soggy faster.
Don’t stack the accordion potatoes tightly on top of each other during storage if possible. Lay them in a single layer or with minimal overlap to prevent the crispy edges from steaming against each other and softening. If you need to stack them, place parchment paper between layers to minimize contact.
For reheating, the oven or air fryer produces the best results by far. Preheat your oven to 425°F, place the potatoes on a wire rack set over a baking sheet, and heat for 8 to 10 minutes until they’re hot throughout and the exterior crisps up again. The wire rack is just as important for reheating as it was for the initial cooking since it allows air circulation that restores some of the lost crispiness.
The air fryer works even better than the oven for reheating because the concentrated heat and rapid air movement restore crispiness more effectively. Set your air fryer to 375°F and reheat the accordion potatoes for 5 to 7 minutes, checking halfway through. The smaller cooking chamber and more efficient air circulation bring back much of the original texture.
Can You Use Sweet Potatoes Instead of Russet Potatoes?
You can make accordion potatoes using sweet potatoes instead of russets, but the texture and flavor will be noticeably different, with less crispiness and more natural sweetness that changes the dish’s character entirely. Sweet potatoes contain more sugar and moisture than russets while having less starch, which affects both how they crisp and how they taste.
The higher sugar content in sweet potatoes means they caramelize and brown more quickly during baking, which can be both good and bad. The faster browning creates deeper color and more caramelization flavor, but it also means the edges can burn before the centers cook through if you’re not careful. You’ll need to watch sweet potato accordion potatoes more carefully during baking and possibly reduce the oven temperature to 400°F to prevent burning while allowing the interiors to cook properly.
Sweet potatoes are naturally moister than russets, containing about 70 to 72% water compared to russets’ 63 to 65%. This extra moisture makes it harder to achieve the same level of crispiness you get with russets. The surfaces can get crispy and caramelized, but they won’t have that shatter-crisp quality that makes russet accordion potatoes so appealing. The texture is more like crispy-edged roasted sweet potatoes rather than the extremely crispy texture you achieve with russets.
Why Are My Accordion Potatoes Not Getting Crispy?
The most common reasons accordion potatoes don’t get crispy are insufficient drying after soaking, inadequate spacing between slices, baking directly on a pan instead of a wire rack, or using the wrong type of potato. Each of these factors prevents the moisture evaporation and proper heat exposure needed for developing crispy texture.
Inadequate drying is the number one culprit. If you don’t pat the potato slices completely dry after soaking, the surface water turns to steam in the oven and keeps the potatoes soft. You need to be aggressive with the drying process, using multiple paper towels and pressing firmly to absorb every bit of moisture. Some cooks think a quick pat is sufficient, but you really need to remove virtually all surface water for the potatoes to crisp properly.
The spacing issue comes up when cooks thread the potato slices onto skewers but don’t fan them apart enough. When the slices touch each other, those contact points create pockets where moisture gets trapped and steam develops. The touching surfaces stay soft and pale while the exposed surfaces crisp. You need visible space between every slice to allow hot air to reach all the surfaces. If your accordion potatoes have soft spots between some slices but crispy spots on the most exposed edges, spacing is likely your problem.
Baking directly on a sheet pan instead of using a wire rack prevents proper air circulation and allows rendered moisture and oil to pool underneath the potatoes. This creates steam that keeps the bottom surfaces soft. The rack elevation is non-negotiable if you want evenly crispy results on all surfaces. Similarly, using parchment paper or silicone mats blocks airflow and traps moisture just like baking directly on the pan.
If you’re looking for more recipes like this recipe, click the link! Check out all of our grilling recipes here for more steak, seafood, and BBQ favorites that are perfect for your next cookout.
COMMON ITEMS USED IN THESE RECIPES
Hasty Bake Charcoal Grill and Smoker
Knitted Gloves
Food Processor
Cast Iron Skillet
Meater +
Upgrade Your Meat Game with Grill Nation x Linz Heritage Angus
If you really want to take your grilling and cooking to the next level, you need to check out our collaboration with Linz Heritage Angus. We’ve partnered with them to bring you some of the best beef you can get your hands on.
Linz Heritage Angus isn’t your typical grocery store meat. These guys are the real deal – they raise their cattle the right way, and you can taste the difference in every bite. We’re talking about beef that’s been dry-aged to perfection, with marbling that makes your mouth water just looking at it.
Check out these premium cuts that’ll change how you think about beef:
Premium Ribeye Steaks – Perfect for special occasions
Dry-Aged Beef Selection – Take your grilling to the next level
Ground Beef & Burger Blends – The foundation of great BBQ